
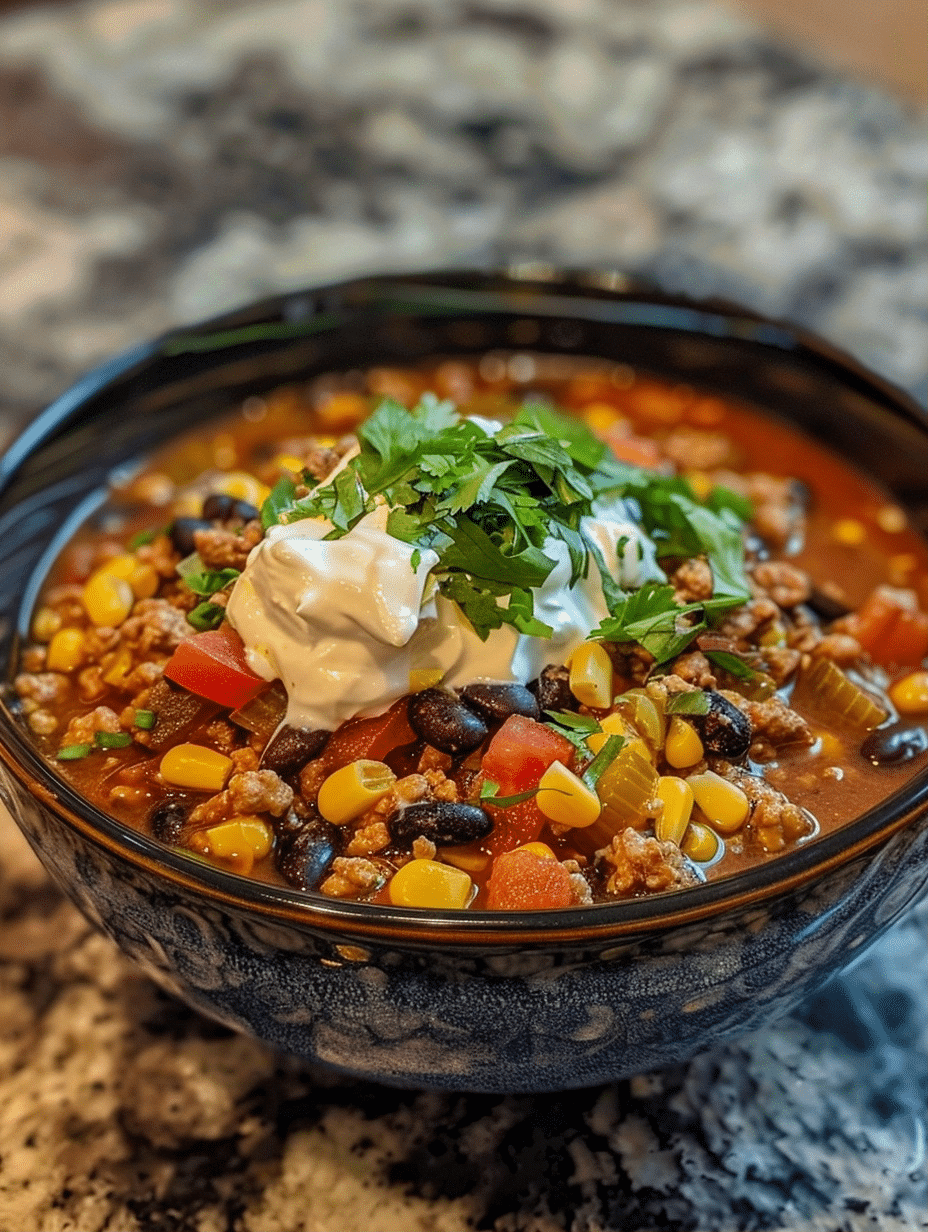
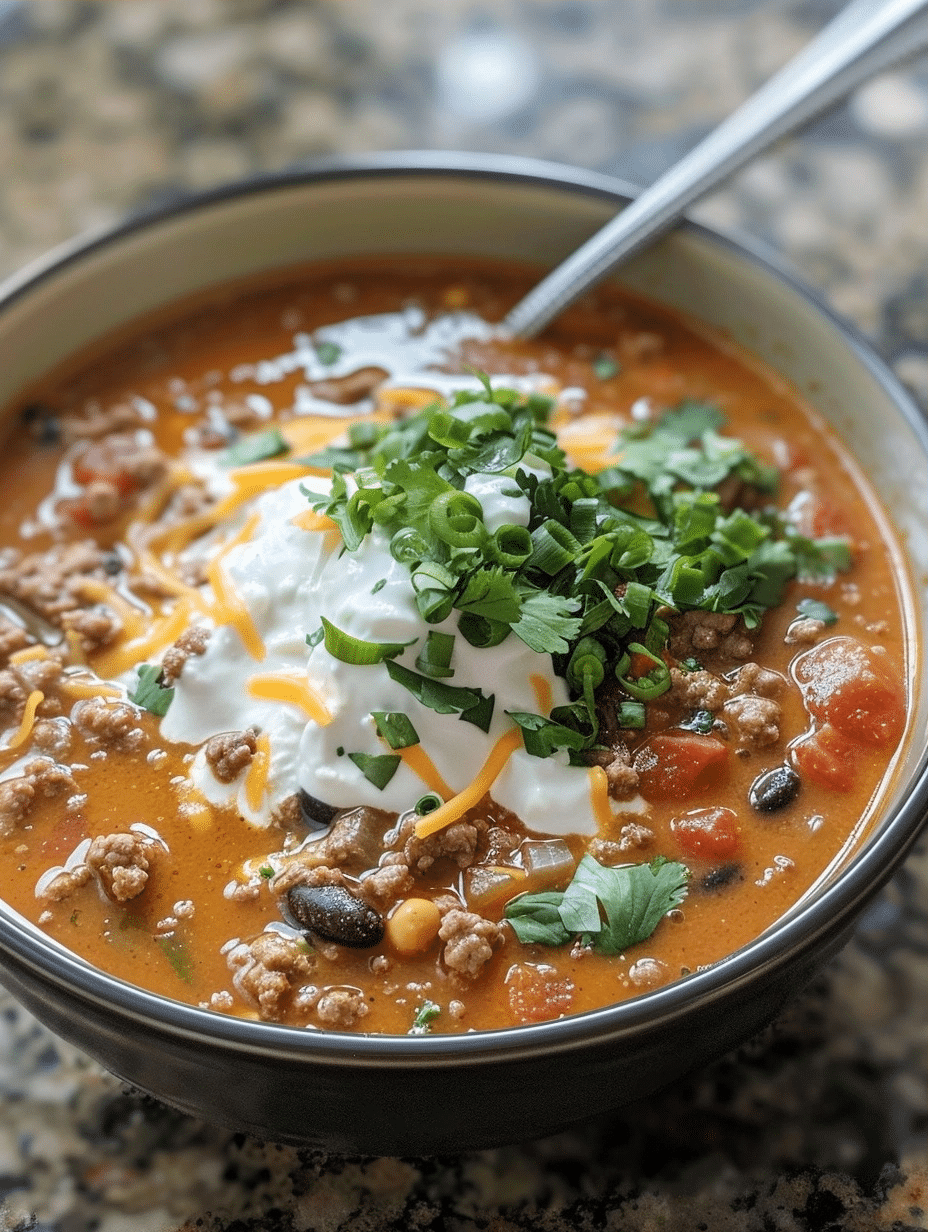
Instant Pot taco soup is a bold, satisfying one-pot meal that combines seasoned ground beef, kidney beans, corn, and diced tomatoes in a rich broth infused with classic Mexican spices. This recipe delivers authentic taco flavors in just 30 minutes, making it perfect for busy weeknights when you need restaurant-quality comfort food at home. The pressure cooker method intensifies flavors while keeping meat tender and vegetables perfectly cooked.
About Eva
I’m Eva Stoner, the creator of Fresh Recipes Corner, where I share simple, reliable recipes for everyday cooking. My love for cooking began in my grandmother’s kitchen, where I learned that good food doesn’t have to be complicated it just needs care, patience, and the right techniques. Those early moments shaped how I cook today and inspired me to keep things practical and approachable.
I developed this instant pot taco soup recipe during a particularly hectic season when my family needed meals that were both nourishing and quick. After testing dozens of variations, I discovered that the pressure cooker’s unique environment builds deeper flavor profiles than traditional stovetop methods. This recipe has become a staple in my home, and I’m thrilled to share it with you.
Recipe Overview
| Metric | Value |
|---|---|
| Prep Time | 10 minutes |
| Cook Time | 12 minutes |
| Total Time | 30 minutes (including pressure release) |
| Servings | 6 servings |
| Difficulty Level | Easy |
| Cuisine | Mexican-American |
Why This Recipe Works
This instant pot taco soup works because it combines the efficiency of pressure cooking with time-tested flavor foundations. The high-pressure environment in the Instant Pot breaks down beef fibers rapidly, delivering fork-tender meat in a fraction of the time traditional methods require. I’ve found that browning the meat first creates a deeper, caramelized base that elevates the entire soup’s complexity.
The bean and vegetable combination provides natural thickening agents and textural contrast that makes each spoonful interesting. Kidney beans add creaminess without dairy, while corn contributes sweetness that balances the savory spices. From my experience testing this recipe, the 12-minute pressure cooking time is the sweet spot where flavors meld completely without vegetables becoming mushy.
What I appreciate most about this recipe is its flexibility for pantry cooking. You likely have most ingredients on hand already, making it an excellent solution for unexpected dinner guests or nights when grocery shopping didn’t happen. The soup actually tastes better the next day as flavors continue to develop, making it ideal for meal prep.
Ingredients
| Ingredient | Quantity | Notes and Alternatives |
|---|---|---|
| Lean ground beef | 1.5 lbs (680g) | Use 90% lean for less fat. Ground turkey or chicken works as substitutes. |
| Yellow onion | 1 large, diced | Provides aromatic base. White onion is acceptable but slightly less sweet. |
| Garlic cloves | 4 cloves, minced | Fresh garlic only. Garlic powder lacks the same depth if fresh is unavailable. |
| Beef broth | 6 cups (1.4L) | Use low-sodium to control salt levels. Vegetable broth creates lighter flavor. |
| Diced tomatoes with green chilies | 2 cans (14.5 oz each) | Rotel brand is traditional. Use plain diced tomatoes if Rotel unavailable. |
| Kidney beans | 2 cans (15 oz each), drained and rinsed | Black beans or pinto beans substitute well. Dried beans require longer cook time. |
| Corn kernels | 1.5 cups (250g), frozen or canned | Fresh corn in season adds premium texture. Canned corn is perfectly acceptable. |
| Chili powder | 2 tablespoons | Use good-quality chili powder for authentic flavor. Ground red pepper is stronger. |
| Cumin | 1.5 tablespoons | Ground cumin is essential for taco flavor. Cannot substitute with caraway seeds. |
| Paprika | 1 teaspoon | Smoked paprika adds depth. Sweet paprika works but lacks that smoky character. |
| Salt | 1 teaspoon | Adjust based on broth saltiness. Taste before adding more. |
| Black pepper | 0.5 teaspoon | Freshly cracked pepper preferred over pre-ground for maximum flavor. |
| Vegetable oil | 1 tablespoon | Use neutral oil for sautéing. Olive oil works but can overpower taco flavors. |
| Lime juice | 2 tablespoons, fresh | Fresh lime essential for brightness. Bottled lime juice is acceptable alternative. |
Step-by-Step Instructions
Phase 1: Sauté and Build Flavor Foundation
Set your Instant Pot to the sauté setting and heat for 3 minutes until the insert is hot.
Add 1 tablespoon vegetable oil to the pot, then carefully add the diced yellow onion.
Cook the onion for 2 minutes, stirring occasionally, until it begins to soften and become translucent.
Add the minced garlic cloves and cook for 30 seconds, stirring constantly to prevent burning.
Crumble the ground beef into the pot, breaking it into small pieces with a wooden spoon.
Brown the beef for 4-5 minutes, stirring frequently, until no pink remains and meat is completely cooked through.
Drain excess fat from the pot if more than 1 tablespoon remains.
Phase 2: Add Spices and Aromatics
Sprinkle the chili powder, cumin, paprika, salt, and black pepper directly over the cooked beef.
Stir continuously for 1 minute to toast the spices and coat all meat pieces evenly.
Pour the beef broth slowly into the pot, scraping the bottom with a wooden spoon to deglaze any browned bits.
Phase 3: Add Remaining Ingredients
Add the 2 cans of diced tomatoes with green chilies, including all liquid, to the pot.
Drain and rinse the kidney beans thoroughly under cold water to remove excess sodium.
Add the rinsed kidney beans to the pot and stir well to combine.
Add 1.5 cups of corn kernels and stir the entire mixture until evenly distributed.
Phase 4: Pressure Cook
Turn off the sauté setting and secure the Instant Pot lid, ensuring the steam release valve is positioned to “sealing.”
Press the “Pressure Cook” or “Manual” button and set the cooking time to 12 minutes at high pressure.
Allow the pot to reach full pressure, which typically takes 8-10 minutes depending on your model.
Phase 5: Release Pressure and Finish
When the beep sounds, allow the pressure to release naturally for 5 minutes.
Manually release any remaining pressure by carefully moving the steam release valve to “venting.”
Remove the lid and stir the soup thoroughly.
Squeeze fresh lime juice into the pot and stir to combine for brightness.
Taste the soup and adjust salt, pepper, or spices as needed before serving.
Chef Tips for Perfect Results
Brown the meat properly before pressure cooking to develop deep Maillard flavors that can’t develop in liquid.
Don’t skip rinsing the canned beans, as this removes excess sodium and prevents an overly salty soup.
Use a natural pressure release for the first 5 minutes to keep vegetables from becoming mushy and overcooked.
Add the lime juice at the very end, as pressure cooking can diminish citrus brightness if added earlier.
Keep the steam release valve at “sealing” not “venting” during the entire pressure cooking cycle for proper pressure buildup.
Taste and adjust seasonings after cooking, as the pressure cooker intensifies salt flavors more than expected.
Common Mistakes to Avoid
Mistake 1: Skipping the Brown Meat Step Many home cooks rush straight from raw meat to adding liquid, which results in pale, bland meat that lacks depth. The Maillard reaction that occurs during browning creates hundreds of new flavor compounds that simply cannot develop in liquid. Fix this by spending the extra 4-5 minutes on the sauté step, ensuring meat achieves a golden-brown color throughout.
Mistake 2: Adding Too Much Liquid The Instant Pot creates more steam than traditional pots, so the broth amount matters significantly. Using 8 cups instead of 6 cups results in a watery, flavorless soup where spices become too diluted. Stick to the recipe’s 6-cup measurement and adjust only if you prefer a brothier consistency in future batches.
Mistake 3: Releasing Pressure Too Quickly Immediately venting all pressure after cooking causes vegetables to overcook as the residual heat continues cooking everything inside the pot. The natural 5-minute release allows internal temperatures to stabilize gently while still preserving vegetable texture. Only manually release any remaining pressure after the natural release completes.
Mistake 4: Neglecting the Deglazing Step Many cooks add broth without scraping the flavorful brown bits stuck to the pot’s bottom, which contain concentrated beef and spice flavors. These caramelized particles dissolve directly into the broth, enriching the entire soup. Always deglaze by scraping with a wooden spoon while adding liquid, ensuring nothing flavorful goes to waste.
Mistake 5: Cooking Too Long Under Pressure Exceeding 12 minutes turns this soup into a mushy blend where individual ingredients lose their identity and beans become soft. The 12-minute mark represents the precise time for beans to soften while maintaining structural integrity and vegetables staying slightly firm. Respect this timing for best texture results.
Variations and Substitutions
| Ingredient | Substitution Option | Impact on Flavor |
|---|---|---|
| Ground beef | Ground turkey or ground chicken breast | Creates leaner soup with slightly milder flavor profile that lets spices shine more prominently. |
| Beef broth | Chicken broth | Produces lighter, less rich soup with cleaner taco flavor without heavy beef undertones. |
| Kidney beans | Black beans or pinto beans | Black beans add earthy depth while pinto beans provide creamier texture without major flavor shift. |
| Corn kernels | Diced bell peppers (red or green) | Substituting removes sweetness and adds fresh vegetable crunch that brightens soup significantly. |
| Diced tomatoes with green chilies | Plain diced tomatoes plus 1 can diced jalapeños | Provides more control over heat level and allows customization of spice intensity to preference. |
| Chili powder | Ground red pepper or cayenne | Creates much spicier soup with less depth; use only half the amount if substituting. |
| Fresh lime juice | Fresh lemon juice | Adds brightness but lacks the distinctive citrus character lime brings to taco flavors. |
| Cumin | Oregano | Shifts flavor toward Mexican-Mediterranean fusion; loses authentic taco soup essence if cumin replaced entirely. |
Serving Suggestions and Pairings
Serve instant pot taco soup in bowls with an array of classic toppings that guests can customize to preference. Shredded cheddar cheese, sour cream, crispy tortilla strips, diced avocado, fresh cilantro, and sliced jalapeños create an interactive dining experience. These toppings add textural contrast and allow each person to adjust heat level and richness to their liking.
For weeknight family dinners, pair this soup with warm cornbread or Mexican street corn (elote) to create a complete meal that feels satisfying without requiring additional proteins. The bread soaks up the flavorful broth perfectly while the corn complements the soup’s Mexican essence.
For casual entertaining, serve this taco soup in bread bowls carved from round loaves, which impresses guests while reducing cleanup requirements. This presentation works exceptionally well for tailgate parties, game day gatherings, or casual lunch parties where the soup becomes the entire main course.
Create a taco soup bar by keeping the base warm in a slow cooker while displaying toppings in small bowls alongside soup ladles and bowls. This approach works beautifully for potlucks or family gatherings where guests appreciate customization options and can build their perfect bowl.
Storage and Reheating
| Storage Method | Duration | Instructions |
|---|---|---|
| Refrigerator in airtight container | 4-5 days | Cool soup completely before transferring to container. Store toppings separately to maintain crispness and prevent sogginess. |
| Freezer in airtight containers | 3 months | Leave 1 inch of headspace for expansion. Label with date and contents. Thaw overnight in refrigerator before reheating. |
| Freezer in freezer-safe bags | 3 months | Portion soup into individual servings in quart-sized bags. Lay flat for compact storage and quick thawing. |
| Stovetop reheating | N/A | Transfer soup to saucepan and heat over medium heat, stirring occasionally, for 8-10 minutes until steaming throughout. |
| Microwave reheating | N/A | Pour individual serving into microwave-safe bowl and heat on 50% power for 3-4 minutes, stirring halfway through. |
| Instant Pot reheating | N/A | Use sauté setting and heat thawed soup for 5 minutes, stirring frequently, until reaching desired temperature. |
Nutritional Information
| Nutrient | Amount per Serving |
|---|---|
| Calories | 285 |
| Protein | 28g |
| Total Fat | 8g |
| Saturated Fat | 3g |
| Carbohydrates | 24g |
| Dietary Fiber | 6g |
| Sugars | 4g |
| Sodium | 892mg |
Approximate values calculated using USDA FoodData Central. Values may vary based on specific ingredient brands and preparation methods. Nutritional information excludes optional toppings like cheese, sour cream, and tortilla strips.
Frequently Asked Questions
Can I use fresh tomatoes instead of canned diced tomatoes with green chilies?
Fresh tomatoes require different preparation and cooking adjustments since they contain less liquid and need longer cooking to break down fully. You would need approximately 4-5 medium fresh tomatoes diced finely, but you must increase the broth to 7 cups to compensate for the lost liquid from canned tomatoes. Additionally, you’d need to add a separate can of diced green chilies since fresh tomatoes lack that element, making this substitution more complex than using canned tomatoes with green chilies.
How do I know when the Instant Pot has reached full pressure?
The Instant Pot reaches full pressure when the float valve (a small plastic pin on top of the lid) rises and seals completely, indicating the internal chamber has pressurized. You will also hear a slight hissing sound when pressure builds and the valve engages. Once the valve floats up into the sealed position, the cooking timer begins counting down the 12 minutes of pressure cooking.
What happens if I cook the soup for longer than 12 minutes under pressure?
Cooking beyond 12 minutes causes beans to become mushy and lose their shape entirely, while vegetables break down into an unappetizing paste. The meat becomes stringy and separates into tiny fibers that disappear into the broth, and the overall soup texture becomes indistinguishable mush. Stick precisely to the 12-minute cooking time for proper texture preservation and ingredient integrity.
Can I make instant pot taco soup ahead and freeze it for meal prep?
Yes, this soup freezes beautifully for 3 months when stored in airtight containers or freezer bags with proper labeling. Cool the soup completely at room temperature before transferring to freezer containers, leaving 1 inch of headspace for expansion during freezing. Thaw overnight in the refrigerator and reheat using any of the methods listed in the storage section above.
What should I serve with instant pot taco soup for a complete meal?
Serve taco soup with warm cornbread, Mexican street corn, tortilla chips with guacamole, or rice for heartier appetites and maximum satisfaction. For lighter meals, a simple garden salad with cilantro-lime dressing complements the soup beautifully without adding excessive weight. Bread bowls carved from round loaves create impressive presentation while serving as edible vessels for the soup itself.
How do I reduce the sodium content in this instant pot taco soup recipe?
Use low-sodium beef broth and low-sodium canned beans, rinsing the beans thoroughly to remove additional sodium from the canning liquid. Reduce the salt added to 0.5 teaspoon instead of 1 teaspoon, tasting before adding more since broth and canned tomatoes contribute significant sodium. Consider using fresh tomatoes instead of canned versions when possible, though this requires other adjustments as noted in the substitutions section.
Final Thoughts
Instant pot taco soup delivers authentic Mexican comfort in just 30 minutes, making it the perfect solution for busy weeknights when you crave satisfying, flavorful food without hours of cooking. This recipe proves that pressure cooking and bold spices combine beautifully to create restaurant-quality soups at home. Serve it with your favorite toppings and enjoy the compliments from everyone at your table.
Instant Pot Taco Soup
Ingredients
- 1 tbsp avocado oil
- 1 lb lean ground beef
- 1 medium onion, diced
- 2 cloves garlic, minced
- 1 tbsp chili powder
- 1 tsp cumin
- 1 tsp paprika
- 1/2 tsp oregano
- 8 oz canned diced tomatoes
- 1 can (15 oz) kidney beans, drained/rinsed
- 1 cup frozen corn
- 4 cups beef broth
- 1 tsp salt
- 1/2 tsp black pepper
- 1/2 jar pickled jalapeños (marinade reserved)
- 1 tbsp white vinegar
Instructions
- Heat avocado oil in Instant Pot on sauté mode
- Browning ground beef until browned, drain excess fat
- Add onion, garlic, chili powder, cumin, paprika, oregano
- Sauté 5 minutes to develop flavor
- Stir in tomatoes, kidney beans, corn, broth, salt, pepper, jalapeño marinade
- Pour in vinegar (avoids alcohol)
- Close lid, set to pressure cook for 12 minutes
- Natural pressure release for 10 minutes
Notes
Use canned navy beans if kidney beans unavailable
Add tortilla chips/cilantro before serving
For vegetarian version, substitute beef with mushrooms or black beans
