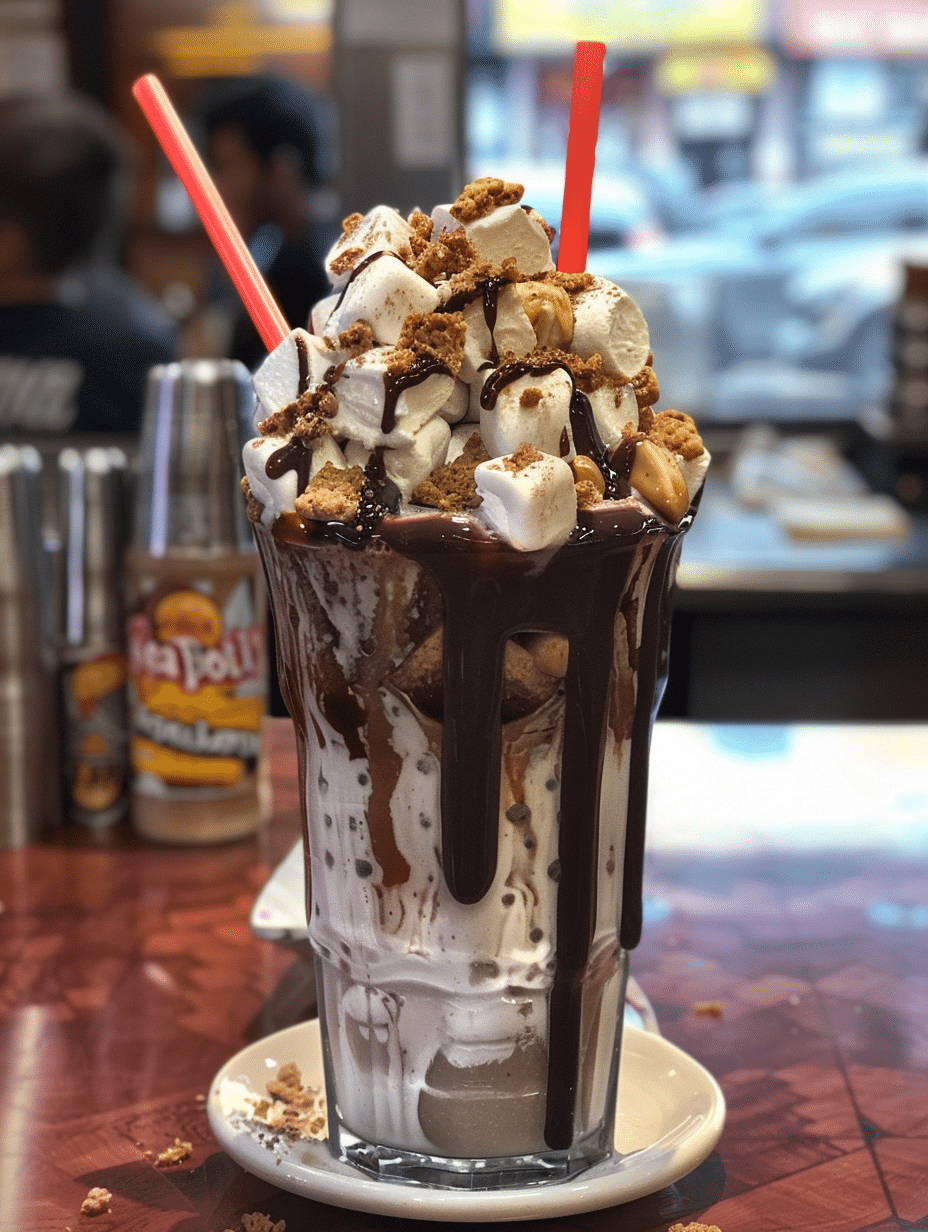
A s’mores milkshake combines creamy vanilla ice cream, rich chocolate, toasted marshmallow, and crunchy graham crackers into one decadent frozen drink. This indulgent beverage captures the nostalgic campfire dessert in blendable form, requiring just five minutes and basic kitchen equipment. The marshmallow adds natural sweetness and airy texture, while crushed graham crackers provide authentic flavor and satisfying crunch that sets this shake apart from ordinary chocolate drinks.
Author & Brand Story
I’m Maya Collins, a 29-year-old from Austin, Texas, and a co-creator at Fresh Recipes Corner, where I focus on simple, refreshing drinks you can make anytime. I started by mixing juices in my mom’s kitchen just for fun, and over time it turned into a real passion. I love working with fruits, herbs, and natural ingredients to create mocktails, smoothies, and soft drinks that are easy but full of flavor.
The s’mores milkshake came to life during a backyard gathering when my nephew requested “campfire flavor in a cup.” I experimented with toasting marshmallows, melting chocolate, and blending graham crackers until I perfected the balance. What started as a single creation has become one of Fresh Recipes Corner’s most-requested summer drinks. My mission remains centered on helping home cooks build confidence with recipes that taste restaurant-quality but demand minimal effort.
Recipe Overview
| Attribute | Details |
|---|---|
| Prep Time | 5 minutes |
| Cook Time | 3 minutes (marshmallow toasting) |
| Total Time | 8 minutes |
| Servings | 2 (12 oz each) |
| Difficulty | Easy |
| Cuisine | American Dessert |
Why This Recipe Works
I created this s’mores milkshake because traditional campfire s’mores require an outdoor setting, fire, and patience that summer afternoons rarely allow. This version delivers identical flavor complexity within minutes, using a standard blender and stovetop. The toasted marshmallow contributes caramelized depth that plain marshmallow fluff cannot achieve, making this shake feel genuinely homemade rather than artificial.
The combination of melted chocolate and whole milk creates a silky base that balances the sweetness of marshmallow and graham crackers. I’ve discovered that crushing graham crackers by hand rather than using crumbs preserves texture integrity during blending, ensuring the final shake maintains bite and authenticity. The rim coating transforms an ordinary glass into a showstopping presentation that impresses guests without requiring advanced technique.
Over my years developing drinks at Fresh Recipes Corner, I’ve learned that nostalgia-driven recipes succeed when they honor original flavors while adapting them for modern convenience. This milkshake achieves that balance perfectly, appealing to both children seeking camp memories and adults craving elevated comfort food drinks.
Ingredients
| Ingredient | Quantity | Notes & Alternatives |
|---|---|---|
| Vanilla Ice Cream | 2 cups (packed) | Use premium quality for richness. Substitute with vanilla yogurt for lighter version. |
| Whole Milk | 1/2 cup | Adjust to 3/4 cup for thinner consistency. Use 2% milk for lower fat option. |
| Chocolate Syrup | 3 tablespoons | Use quality chocolate syrup or melt 2 oz chocolate bar. Cocoa powder works as healthier alternative. |
| Large Marshmallows | 4 whole | Toast marshmallows for caramelized flavor. Mini marshmallows require less cooking time. |
| Graham Crackers | 4 whole crackers | Hand-crush for texture. Honey graham variants add subtle sweetness. |
| Unsalted Butter | 1 tablespoon | For marshmallow toasting and rim coating. Coconut oil works as dairy-free substitute. |
| Whipped Cream | 1/4 cup (topping) | Use freshly whipped or refrigerated store-bought. Optional but recommended for authentic presentation. |
| Vanilla Extract | 1/4 teaspoon | Enhances overall flavor depth. Omit if using premium ice cream with vanilla bean. |
Step-by-Step Instructions
Prepare Your Marshmallows
- Thread 4 large marshmallows onto a long-handle roasting stick or metal skewer.
- Hold marshmallows 4 inches above a gas flame or over a stovetop burner on medium heat.
- Rotate slowly for 2-3 minutes until the exterior turns golden brown and begins caramelizing.
- Transfer toasted marshmallows to a clean plate and let cool for 1 minute until handle-safe.
Crush Your Crackers
- Place 4 whole graham crackers in a clean plastic bag or between parchment paper.
- Crush with a rolling pin or meat mallet until pieces range from fine crumbs to quarter-inch chunks.
- Reserve 2 tablespoons of crushed crackers for the rim and blending base.
- Set remaining crushed crackers aside for topping garnish.
Prepare the Rim
- Melt 1 tablespoon butter in a small skillet over low heat for 30 seconds.
- Mix melted butter with 2 tablespoons crushed graham crackers on a shallow plate.
- Dip the rim of two tall milkshake glasses into the graham-butter mixture, coating evenly.
- Return rimmed glasses to the refrigerator while preparing the shake base.
Blend the Shake
- Add 2 cups packed vanilla ice cream to a blender first for even distribution.
- Pour 1/2 cup whole milk over the ice cream to prevent clumping.
- Add 3 tablespoons chocolate syrup and 1/4 teaspoon vanilla extract to the blender.
- Remove marshmallows from skewers and add all 4 toasted marshmallows to the blender.
- Pulse on low speed for 3 seconds to break down marshmallows without over-mixing.
- Increase to medium-high speed and blend for 15-20 seconds until smooth and creamy.
- Stop blending immediately when the mixture reaches uniform consistency to preserve marshmallow texture.
Serve Immediately
- Pour the s’mores milkshake evenly between the two rimmed glasses, filling three-quarters full.
- Top each milkshake with 2 tablespoons fresh whipped cream.
- Sprinkle remaining crushed graham crackers over whipped cream in even layer.
- Place one whole toasted marshmallow on top of whipped cream as garnish.
- Insert a sturdy straw and serve immediately to maintain ideal temperature and texture.
Chef Tips for Perfect Results
- Toast marshmallows over gas flames, not electric burners. Gas flames create direct, even heat that caramelizes the exterior while keeping interiors soft. Electric coils heat unpredictably and risk burning rather than toasting. A kitchen torch serves as an excellent alternative for precision control and consistent browning.
- Use hand-crushed graham crackers instead of processed crumbs. Store-bought graham cracker crumbs contain preservatives and powder finely, diminishing texture in the finished shake. Hand-crushing preserves varying chunk sizes that provide satisfying bite throughout the drink and maintain structural integrity during blending.
- Blend ingredients in the correct order to avoid clumping. Placing ice cream first prevents milk from settling at the bottom, and adding marshmallows last ensures even distribution. Blending for precisely 15-20 seconds prevents over-mixing, which incorporates excess air and creates an overly light, foamy texture rather than luxurious creaminess.
- Coat glasses with graham-butter mixture while shakes blend. This timing prevents the coating from becoming sticky or wet, which happens if done too far in advance. The slight humidity from the blender actually enhances adhesion, making rim coating adhere better than in a dry kitchen environment.
- Chill milkshake glasses for 15 minutes before serving. Cold glasses maintain shake temperature longer and prevent melting during consumption. Cold glass surfaces also intensify the chocolate and marshmallow flavors by slowing sensory adaptation, making each sip taste progressively richer.
- Add vanilla extract specifically, even when using premium ice cream. The small amount enhances marshmallow and chocolate notes through flavor amplification rather than taste addition. This technique, learned through years of recipe development, works because vanilla’s aromatic compounds activate complementary flavor receptors in both marshmallow and cocoa.
Common Mistakes to Avoid
| Mistake | Why It Happens | How to Fix It |
|---|---|---|
| Burnt Exterior, Cold Interior | Holding marshmallows too close to flame or roasting too long causes surface to char before heat penetrates center. | Maintain 4-inch distance from flame and rotate every 30 seconds. Total roasting time should be 2-3 minutes maximum. Exterior should caramelize to golden brown, not blacken. |
| Overly Thick or Foamy Shake | Over-blending incorporates excess air and creates texture similar to mousse rather than milkshake. Using frozen ice cream straight from freezer compounds this issue. | Blend for exactly 15-20 seconds after all ingredients combine. If shake becomes foamy, stop immediately and pour quickly. Soften ice cream at room temperature for 2 minutes before blending for improved blendability. |
| Graham Cracker Coating Falls Off | Rim becomes wet from condensation or coating applied too early, preventing adhesion. Dry butter-cracker mixture fails to stick to moist glass. | Prepare rim coating immediately before blending and pour immediately after completion. Ensure rim coating remains dry by storing it in a small bowl rather than on a plate. Pat glass rim dry with paper towel before coating if condensation appears. |
| Loss of Marshmallow Texture During Blending | Extended blending time dissolves marshmallow structure into homogenous mixture, eliminating desired texture variation. Marshmallows need protection from over-processing. | Add marshmallows to blender last and use pulse function for 3 seconds before increasing speed. Blend only until mixture reaches uniform color and consistency, then stop immediately. Accept that some marshmallow chunks will remain, creating authentic texture. |
| Shake Melts Too Quickly During Consumption | Warm kitchen temperature or over-sized glass increases surface area exposed to room temperature. Insufficient initial chilling allows rapid temperature transfer. | Refrigerate glasses for minimum 15 minutes before serving. Use standard milkshake glasses rather than oversized bowls to minimize exposed surface area. Serve immediately after preparation. Place glasses on ice or in shallow bowls containing ice during serving for extended temperature maintenance. |
Variations and Substitutions
| Ingredient | Substitution Option | Impact on Flavor & Texture |
|---|---|---|
| Vanilla Ice Cream | Chocolate Ice Cream | Creates double-chocolate intensity; reduces marshmallow prominence. Best for chocolate purists. Substitute only half the vanilla for balanced approach. |
| Chocolate Syrup | Melted Dark Chocolate (2 oz) | Adds sophisticated depth and reduces sweetness. Dark chocolate version appeals to adult palates. Creates slightly thicker shake requiring additional milk. |
| Whole Milk | Heavy Cream (1/4 cup) + Milk (1/4 cup) | Produces richer, more indulgent texture. Increases calorie content significantly. Creates restaurant-quality density and mouthfeel. |
| Large Marshmallows | Marshmallow Fluff (1/4 cup) | Eliminates toasting step but reduces caramelized flavor complexity. Shake becomes slightly sweeter and airier. Best for quick preparations when time-pressed. |
| Graham Crackers | Honey Graham Crackers | Adds subtle honey undertones and increased sweetness. Creates more dessert-like flavor profile. Use same quantity as regular crackers. |
| Whipped Cream Topping | Marshmallow Whipped Cream | Combines marshmallow and whipped cream for intensified flavor. Creates more decadent presentation. Add 1 teaspoon marshmallow extract to 1/4 cup whipped cream. |
| Graham Crackers | Digestive Biscuits (UK Version) | Produces milder, buttery flavor compared to American graham sweetness. Creates more sophisticated European-style dessert beverage. |
| Vanilla Extract | Almond Extract (1/8 teaspoon) | Adds subtle nutty complexity beneath marshmallow sweetness. Use half the quantity as almond extract concentrates rapidly. Creates unexpected flavor dimension. |
Serving Suggestions and Pairings
The s’mores milkshake performs best as an afternoon treat during summer months when outdoor entertaining peaks. Serve this drink alongside grilled items like barbecued burgers or hot dogs to create nostalgic picnic memories. The creamy sweetness balances savory grilled flavors while maintaining appropriate portion sizes within larger meals.
Pair the s’mores milkshake with light appetizers including veggie crudités, cheese boards, or fresh fruit platters. The rich chocolate-marshmallow combination supports appetizer grazing without overwhelming palates. For dessert-focused occasions, serve alongside brownie bites, chocolate-chip cookies, or seasonal fruit tarts that echo campfire dessert traditions.
This shake excels at children’s birthday parties, where the DIY toasting element transforms preparation into entertainment. Teens enjoy creating personalized versions using the substitution variations provided earlier. Adult gatherings benefit from upscaled presentations using premium chocolate and artisanal marshmallows that elevate perceived value and sophistication.
Consider offering s’mores milkshakes at summer block parties, family reunions, or casual backyard hangouts where nostalgia resonates strongly. The drink requires minimal table space and serves well in outdoor settings, making it ideal for casual entertaining. Prepare ingredients in advance so guests can customize their shakes using alternative options from the variations section.
Storage and Reheating
| Method | Duration | Instructions |
|---|---|---|
| Refrigerated (Prepared Shake) | 1-2 hours maximum | Store in sealed glass container with airtight lid. Separation occurs as marshmallow settles and ice cream melts slightly. Shake vigorously before consuming to recombine ingredients. Quality degrades rapidly after 90 minutes. |
| Frozen (Prepared Shake) | 3-4 days | Pour prepared shake into freezer-safe container, leaving 1 inch headspace for expansion. Cover tightly with plastic wrap before adding lid. Thaw at room temperature for 15 minutes before consumption. Texture becomes icy rather than creamy. |
| Individual Component Storage | Varies by item | Store toasted marshmallows in airtight container for 2 days. Keep crushed graham crackers in sealed bag for 5 days. Chocolate syrup stores indefinitely in pantry. Pre-prepared rim coating holds for 3 days refrigerated in covered container. |
| Unmade Blender Batch | Not Recommended | Milkshake base begins separating immediately after blending. Pre-blended shakes stored longer than 2 hours develop unpleasant grainy texture from melting ice cream. Always blend immediately before serving for optimal results. |
| Ingredient Prep Ahead | 24 hours maximum | Toast marshmallows and crush graham crackers up to 24 hours in advance. Store marshmallows in airtight container at room temperature. Store crushed crackers in sealed bag or container to maintain crispness. Prepare rim coating mixture immediately before use. |
Nutritional Information
Approximate values per serving (one 12 oz shake):
| Nutrient | Amount per Serving |
|---|---|
| Calories | 385 kcal |
| Protein | 6.2 g |
| Total Fat | 14.8 g |
| Saturated Fat | 8.9 g |
| Carbohydrates | 54.3 g |
| Dietary Fiber | 0.4 g |
| Total Sugars | 48.1 g |
| Sodium | 182 mg |
| Cholesterol | 28 mg |
| Calcium | 198 mg (20% DV) |
| Iron | 0.8 mg (4% DV) |
Nutritional information calculated using standard USDA database values for ingredients listed. Variations using alternative ingredients will produce different nutritional profiles. Values exclude whipped cream topping if added.
Frequently Asked Questions
Can I make a s’mores milkshake without toasting marshmallows fresh?
Yes, marshmallow fluff or pre-toasted marshmallow pieces work as functional substitutes, though they produce noticeably different flavor results. Fresh-toasted marshmallows provide caramelized depth that fluff lacks entirely, as fluff contains stabilizers that prevent browning. If time-pressed, buy pre-toasted marshmallows from specialty candy shops or online retailers, which capture 70-80% of the fresh-toasted experience at the cost of convenience.
How do I know when marshmallows are properly toasted for this recipe?
Properly toasted marshmallows display a uniform golden-brown exterior with slight caramelization visible across the surface. The exterior should feel slightly firm to the touch while the interior remains soft and melted when pressed gently with a fork. Rotate every 30 seconds during the 2-3 minute toasting window to ensure even browning. If the exterior turns black or develops charred spots, the marshmallow has overtoasted and will introduce bitter flavors into your shake.
What if I don’t have a gas stove to toast marshmallows?
An electric kitchen torch serves as the superior alternative for toasting marshmallows, providing precise heat control and consistent results superior to electric stovetop burners. Place marshmallows on a skewer or metal stick held horizontally, then apply torch flame from 4 inches away while rotating slowly. A traditional fireplace or outdoor grill also works effectively. If none of these options exist, place marshmallows on a metal skewer 6-8 inches under a broiler set to high heat for 2-3 minutes, rotating halfway through.
Can I prepare a s’mores milkshake several hours in advance?
Preparing s’mores milkshakes more than 2 hours before serving produces grainy, separated drinks with unpleasant texture and diminished marshmallow flavor. Ice cream melts gradually while marshmallow settles to the bottom, requiring vigorous re-blending that over-incorporates air. For advance preparation, toast marshmallows and crush graham crackers up to 24 hours ahead, then blend fresh shakes immediately before serving. This approach maintains quality while reducing active preparation time to under 5 minutes.
Are there dairy-free options for making a s’mores milkshake?
Dairy-free s’mores milkshakes work well using coconut, oat, or almond-based ice cream combined with unsweetened almond milk or oat milk in equal proportions to regular dairy versions. Use coconut oil instead of butter for the rim coating, and ensure marshmallows contain no gelatin (which sometimes derives from animal sources) or purchase plant-based marshmallow alternatives. The shake will taste nearly identical to traditional versions while remaining fully dairy-free and vegan-compatible with this approach.
How can I make a lighter or healthier s’mores milkshake variation?
Create a lighter version using Greek yogurt combined with 1 cup vanilla ice cream instead of the full 2 cups, with an additional 1/4 cup milk to reach proper blending consistency. Use reduced-sugar chocolate syrup or cocoa powder mixed with honey as sweetener alternatives. Reduce marshmallows to 2 and use whipped Greek yogurt instead of cream for topping. This version reduces calories to approximately 240 per serving while maintaining core s’mores flavors, though the texture becomes slightly less creamy than the traditional recipe.
Conclusion
This s’mores milkshake delivers campfire nostalgia in blendable form, combining toasted marshmallow, melted chocolate, and graham crackers into one indulgent summer drink. The recipe accommodates substitutions and variations while maintaining its signature caramelized marshmallow flavor throughout. Prepare this creamy shake for your next gathering and watch guests rediscover childhood memories with every sip of this iconic frozen dessert.
About the Author: Maya Collins creates simple, flavorful drink recipes at Fresh Recipes Corner, bringing professional expertise to home kitchen environments. Her passion for natural ingredients and straightforward techniques has helped thousands of home cooks build confidence with drinks that taste restaurant-quality but require minimal effort.
S’mores Milkshake
Ingredients
- 2 cups vanilla ice cream
- 1/2 cup chocolate sauce or melted chocolate
- 1/4 cup whipped marshmallow or marshmallow fluff
- 2 tablespoons crushed graham crackers, for base
- 1 marshmallow, toasted for garnish
- 1 cup whole milk
Instructions
- Toast marshmallow in a skillet over low heat until golden-brown.
- In a blender, combine vanilla ice cream, chocolate sauce, whipped marshmallow, and whole milk. Blend until smooth.
- Pour mixture into 12 oz glasses with crushed graham crackers as a rim base.
- Top with a toasted marshmallow and additional crushed crackers if desired.
- Serve immediately for optimal texture.
Notes
Crush graham crackers by hand for better texture retention during blending.
Store in airtight containers for up to 24 hours if freezing without milk (add milk later).