A peanut butter cup milkshake is a thick, creamy frozen drink that combines smooth peanut butter, rich chocolate, and cold milk into a single indulgent treat. This beloved dessert beverage blends vanilla ice cream with quality peanut butter and cocoa powder to recreate that signature candy flavor in drinkable form. The result is a satisfying shake that tastes like a liquid peanut butter cup, complete with the perfect balance of nutty and chocolatey sweetness. Whether you’re craving an afternoon pick-me-up or a dessert beverage after dinner, this homemade peanut butter cup milkshake delivers nostalgic flavor without artificial ingredients. I’ve perfected this recipe through years of experimentation, and it’s become a family favorite that takes just five minutes to prepare.
About Me and Fresh Recipes Corner
I’m Maya Collins, a 29-year-old from Austin, Texas, and co-creator at Fresh Recipes Corner, where I focus on simple, refreshing drinks you can make anytime. I started by mixing juices in my mom’s kitchen just for fun, and over time it turned into a real passion. I love working with fruits, herbs, and natural ingredients to create mocktails, smoothies, and soft drinks that are easy but full of flavor.
My journey with milkshakes began when I wanted to recreate childhood favorites using better ingredients. Traditional peanut butter cup milkshakes often contain artificial flavorings and excessive sugar. Through countless iterations, I developed a version using real peanut butter, quality cocoa, and pure vanilla extract. This experience taught me that simple, whole ingredients create superior taste and texture. My background in recipe development helps me understand why certain techniques produce the creamiest results and how to achieve perfect consistency every time.
Recipe Overview
| Metric | Value |
|---|---|
| Prep Time | 5 minutes |
| Cook Time | 0 minutes |
| Total Time | 5 minutes |
| Servings | 2 servings |
| Difficulty Level | Easy |
| Cuisine Type | American |
Why This Recipe Works
This peanut butter cup milkshake recipe creates an exceptionally smooth texture because it uses natural peanut butter combined with cold ice cream as the base. When you blend these two ingredients together, the peanut butter disperses evenly throughout the milk, creating that signature thick consistency without lumps. The cocoa powder dissolves completely into the milk when whisked in first, preventing graininess that often ruins homemade shakes.
I discovered through experimentation that adding the peanut butter before the ice cream makes a significant difference in blending. When peanut butter sits at the bottom of the blender, it tends to stick and create clumps. By combining it with milk first, it becomes fluid enough to mix smoothly with the frozen ice cream. This simple step eliminates the frustration of dealing with chunks of peanut butter in your final drink.
The chocolate flavor comes from unsweetened cocoa powder rather than chocolate syrup, which prevents the shake from becoming overly sweet or thin. This approach gives you control over sweetness while maintaining authentic chocolate intensity. The result is a balanced, indulgent beverage that satisfies cravings without being cloying or artificial-tasting.
Ingredients
| Ingredient | Quantity | Notes and Alternatives |
|---|---|---|
| Vanilla ice cream | 3 cups | Use full-fat ice cream for creamiest results. Creamy vanilla tastes best, but plain vanilla works too. |
| Creamy peanut butter | 1/4 cup | Use natural peanut butter with no added sugars. Crunchy peanut butter creates a grainier texture. |
| Whole milk | 1 cup | Substitute with 2% milk for a lighter version or almond milk for dairy-free option. |
| Unsweetened cocoa powder | 2 tablespoons | Dutch-process cocoa provides deeper chocolate flavor. Regular cocoa powder works well too. |
| Granulated sugar | 2 tablespoons | Reduce to 1 tablespoon for lower sweetness. Honey or maple syrup can replace sugar. |
| Pure vanilla extract | 1/2 teaspoon | Essential for depth. Do not skip or substitute with vanilla flavoring. |
| Sea salt | Pinch | Enhances peanut butter and chocolate flavors. Use fleur de sel for best quality. |
Step-by-Step Instructions
Prepare the Dry Ingredients
- Combine cocoa powder and granulated sugar in a small bowl by whisking together thoroughly.
- Break apart any clumps in the cocoa powder using the back of your whisk or spoon.
- This step prevents cocoa lumps from forming when you add milk.
Build Your Blender Base
- Pour whole milk into your blender container first as the liquid base.
- Add the cocoa and sugar mixture to the milk immediately.
- Blend on low speed for 10 seconds until the cocoa dissolves completely into the milk.
- Add creamy peanut butter by scooping it into the milk mixture.
- Blend on low speed for 15 seconds until peanut butter incorporates fully.
Incorporate Ice Cream and Finishing
- Scoop vanilla ice cream into the blender, filling the container about two-thirds full.
- Pour vanilla extract over the ice cream and sprinkle salt on top.
- Place the blender lid on securely and blend on high speed for 20 to 25 seconds.
- Stop blending when the mixture reaches a thick, pourable consistency with no visible ice chunks.
- Pour the peanut butter cup milkshake into two tall glasses immediately after blending.
Chef Tips for Perfect Results
- Soften your ice cream for 30 seconds at room temperature before blending for easier mixing and smoother texture without overblending.
- Use cold milk from the refrigerator to prevent the shake from becoming too thin or warm during blending.
- Blend in short pulses rather than continuous running to maintain thick consistency and prevent ice cream from becoming soupy.
- Add an extra tablespoon of peanut butter if you prefer intense peanut flavor and richer mouthfeel.
- Chill your serving glasses in the freezer for 5 minutes before pouring for a colder, longer-lasting shake.
- Blend only what you need immediately, as this shake separates quickly and doesn’t store well unmixed.
Common Mistakes to Avoid
Mistake 1: Adding Peanut Butter Too Late Adding peanut butter directly to ice cream creates thick clumps that refuse to blend smoothly. Fix this by mixing peanut butter with cold milk first, then adding to the blender.
Mistake 2: Using Powder Cocoa Without Dissolving First Cocoa powder sprinkled directly onto ice cream creates unappetizing brown flecks and gritty texture throughout your shake. Dissolve cocoa in milk at the beginning of blending to prevent this.
Mistake 3: Overblending for Too Long Blending longer than 30 seconds causes ice cream to melt too much, resulting in a thin, watery beverage instead of a thick shake. Stop blending as soon as you reach pourable consistency with no ice visible.
Mistake 4: Forgetting the Vanilla Extract Vanilla extract deepens flavor complexity and prevents the shake from tasting flat or one-dimensional. Omitting it leaves your drink tasting hollow despite having all other ingredients.
Mistake 5: Using Sweetened Peanut Butter Commercial peanut butter brands with added sugars make the shake overly sweet and create a cloying aftertaste. Always use natural or organic peanut butter with only salt in the ingredient list.
Variations and Substitutions
| Ingredient | Substitution | Impact on Flavor |
|---|---|---|
| Vanilla ice cream | Chocolate ice cream | Increases chocolate intensity and reduces peanut butter prominence for a richer, deeper flavor profile. |
| Creamy peanut butter | Almond butter or cashew butter | Creates a milder, more delicate nuttiness with subtle sweetness compared to bold peanut flavor. |
| Whole milk | Oat milk or cashew milk | Adds slight creaminess with plant-based option while maintaining thickness and rich mouthfeel. |
| Unsweetened cocoa powder | Carob powder | Provides chocolate-like flavor that’s naturally sweeter with less bitterness and unique earthy notes. |
| Granulated sugar | Honey or agave nectar | Sweetens naturally with added floral or caramel undertones that enhance overall depth. |
| Pure vanilla extract | Bourbon vanilla extract | Intensifies vanilla notes with deeper complexity and richer, more sophisticated flavor dimension. |
Serving Suggestions and Pairings
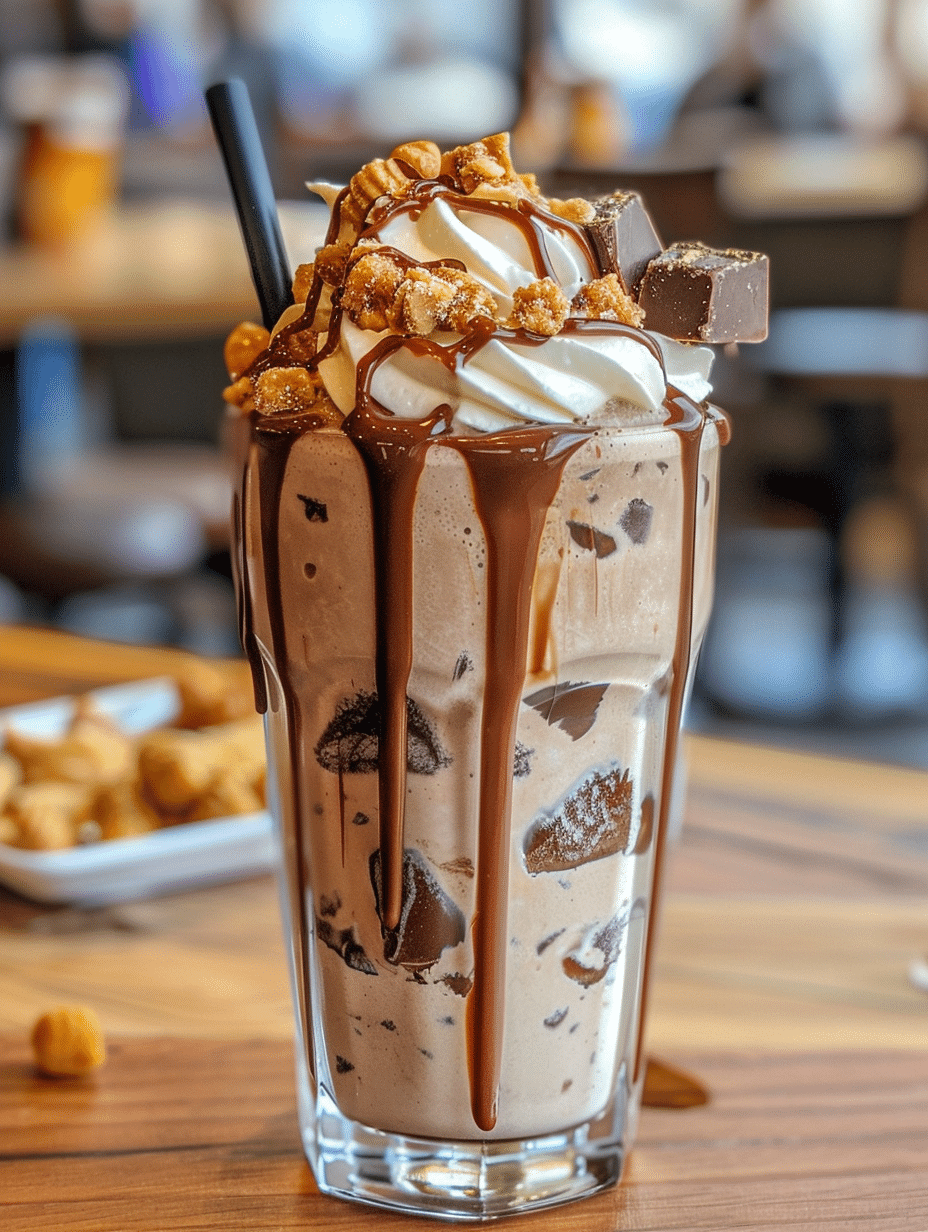
Serve your peanut butter cup milkshake immediately after blending while it’s at peak thickness and coldness. Pour into chilled tall glasses and garnish with a drizzle of melted peanut butter down the inside of the glass for visual appeal and extra flavor. Top with whipped cream, crushed chocolate cookie crumbs, or a sprinkle of cocoa powder for restaurant-style presentation.
Pair this shake with crispy waffle cones, chocolate chip cookies, or buttery shortbread cookies for an elevated dessert experience. Serve alongside fresh fruit like banana slices or strawberries to balance the richness with natural sweetness. This shake works perfectly as an afternoon snack with nothing else needed, or as a dessert beverage after a light dinner.
For special occasions, make peanut butter cup milkshakes for birthday parties, summer gatherings, or movie nights. Create a milkshake bar with various toppings and let guests customize their own versions. This drink also makes an excellent birthday breakfast treat or post-workout recovery beverage for peanut butter cup enthusiasts.
Storage and Reheating
| Method | Duration | Instructions |
|---|---|---|
| Immediate consumption | Best served within 5 minutes | Pour into glasses immediately after blending while maximum thickness and chill are present. |
| Refrigerator storage | Up to 2 hours | Transfer unused shake to an airtight container and refrigerate. Separation may occur, so stir before serving. |
| Freezer storage | Up to 1 week | Pour into freezer-safe containers leaving 1 inch headspace. Thaw in refrigerator and reblend for 10 seconds before serving. |
| Not recommended | N/A | Do not attempt to reheat milkshakes. The texture becomes grainy and ice cream separates irreversibly. |
Nutritional Information
Approximate values per serving based on standard recipe without modifications.
| Nutrient | Amount per Serving |
|---|---|
| Calories | 420 calories |
| Protein | 12 grams |
| Total Fat | 22 grams |
| Saturated Fat | 10 grams |
| Carbohydrates | 45 grams |
| Dietary Fiber | 2 grams |
| Sugars | 38 grams |
| Sodium | 180 milligrams |
Frequently Asked Questions
Can I make a peanut butter cup milkshake without a blender?
No, a blender is essential for creating the smooth, uniform texture that defines a quality milkshake. Hand-whisking cannot adequately mix frozen ice cream with peanut butter and milk into a cohesive beverage. Consider using an immersion blender as an alternative if you lack a traditional blender.
What type of peanut butter works best for milkshakes?
Natural creamy peanut butter produces the smoothest, most authentic flavor without added oils or sugars that commercial brands contain. Check that your peanut butter contains only peanuts and salt in the ingredient list. Avoid crunchy peanut butter, which creates a grainy texture throughout your shake.
How do I fix a peanut butter cup milkshake that turned out too thin?
Add more ice cream immediately in 1/2 cup increments and blend briefly until you reach desired thickness. You can also freeze your blended shake in a bowl for 15 minutes before serving, though this sacrifices the fresh-blended quality. Prevention works better by using properly frozen ice cream and minimal blending time.
Can I prepare peanut butter cup milkshake ingredients ahead of time?
Yes, measure all dry ingredients into a bowl and refrigerate the peanut butter and milk in separate containers for up to 24 hours before blending. This preparation reduces blending time but does not improve final texture or flavor. Blend all components together only when ready to serve for best results.
Is this peanut butter cup milkshake recipe suitable for dairy-free diets?
Yes, substitute dairy ice cream with coconut or cashew cream-based frozen dessert, and use unsweetened oat milk or almond milk instead of whole milk. These substitutions create a dairy-free version with similar creaminess and peanut butter cup flavor. Ensure your peanut butter is also dairy-free and contains no cross-contamination.
What is the best time of day to drink a peanut butter cup milkshake?
Enjoy this shake as an afternoon snack between meals, post-workout recovery beverage, or dessert drink after dinner. The combination of protein from peanut butter and carbohydrates makes it suitable for afternoon energy boost around 3 PM. Avoid consuming immediately before bedtime due to sugar content and dairy, which may disturb sleep.
Conclusion
This homemade peanut butter cup milkshake recipe delivers authentic chocolate and peanut butter flavor in a thick, creamy package you control completely. By following these techniques and using quality ingredients, you create a superior shake that outperforms any restaurant version. Make this recipe your go-to dessert beverage, and enjoy the perfect balance of rich peanut butter and chocolate sweetness every single time.
Peanut Butter Cup Milkshake
Ingredients
- 1 cup cold whole milk
- 2 scoops vanilla ice cream (about 1 cup)
- 1/2 cup creamy natural peanut butter
- 2 tablespoons unsweetened cocoa powder
- 1/2 teaspoon pure vanilla extract
- Pinch of salt
Instructions
- 1. In blender, combine milk and cocoa powder. Whisk briefly until smooth.
- 2. Add vanilla ice cream, peanut butter, vanilla extract, and salt.
- 3. Blend on high until fully combined and creamy, about 1 minute.
- 4. Pour into glasses and top with whipped cream and chocolate shavings, if desired.
Notes
Adjust cocoa powder/sweetness to taste.
Substitute oat milk for a dairy-free version.
Best served immediately for optimal texture.