
A Minecraft cake is a visually stunning dessert that combines the classic vanilla sponge cake with chocolate fondant squares arranged in an iconic 8×8 pixel grid pattern, exactly replicating the blocky aesthetic of the popular video game. This layered cake features a tender, moist vanilla base topped with chocolate frosting and precision-cut fondant tiles that transform your dessert into an edible recreation of Minecraft’s signature cubic design. Whether you’re celebrating a gamer’s birthday or simply looking for a conversation-starting dessert, this Minecraft cake delivers both flavor and Instagram-worthy presentation that impresses kids and adults alike.
Author and Baker Story
I’m Lila Bennett, a 34-year-old home baker based in Portland, Oregon, and my kitchen is almost always filled with the smell of something sweet. I fell in love with baking as a kid, sneaking tastes of cookie dough and watching simple ingredients turn into something comforting and delicious. What started with slightly overbaked cookies turned into years of experimenting with cakes, pancakes, and all kinds of desserts—learning through trial, error, and a lot of taste-testing.
My journey into novelty cakes began when my nephew became obsessed with Minecraft during middle school. He mentioned offhandedly that a Minecraft cake would be “pretty cool,” and I couldn’t resist the challenge. That first attempt was rough—my chocolate fondant cracked, my grid was uneven, and I burned the edges. But that failure taught me more than success ever could. I spent the next year perfecting this recipe, testing different cake-to-frosting ratios, experimenting with fondant techniques, and discovering exactly how to structure the layers for maximum stability and flavor.
Now, after baking over 40 Minecraft cakes for friends, family, and a few local orders, I’ve refined this recipe to be foolproof enough for home bakers while sophisticated enough to satisfy serious cake enthusiasts. Every Minecraft cake I’ve made has sparked joy and amazement—that moment when someone sees their favorite game transformed into an edible masterpiece is pure magic. I’m sharing my complete recipe and hard-won techniques with you because I believe everyone deserves to create this showstopping dessert with confidence.
Recipe Overview
| Prep Time | 45 minutes |
| Cook Time | 35 minutes |
| Total Time | 2 hours 15 minutes (including cooling and assembly) |
| Servings | 12-16 slices |
| Difficulty | Intermediate |
| Cuisine | American Dessert |
Why This Recipe Works
I’ve tested this Minecraft cake recipe dozens of times, and the secret lies in the balance between structural integrity and authentic flavor. The two-layer vanilla sponge provides enough stability to support the fondant grid without tasting dense or overly sweet. Unlike heavier chocolate cakes that would be visually overwhelmed by the detailed pixel design, vanilla allows the Minecraft cake’s graphic element to become the true star.
The buttercream layer between the sponge and chocolate frosting is crucial—it acts as an adhesive that locks everything together while adding moisture that keeps each slice tender for days. When I skip this step or use store-bought frosting, the cake dries out rapidly and the fondant begins to crack and separate. Through experimentation with different chocolate frostings, I discovered that a dark chocolate ganache-style frosting works best because it sets firmly enough to hold the fondant squares without looking brittle or artificial.
What makes this particular Minecraft cake method foolproof is the fondant square technique. Rather than hand-sculpting complex details, you’re creating a clean grid pattern that looks intentionally geometric and true to the game. The precision actually makes the cake easier to execute than you might think—it’s all about measurement and patience rather than artistic skill. After my first five attempts, I realized that home bakers succeed with this recipe when they focus on clean lines and consistent sizing rather than trying to replicate photorealistic textures.
Ingredients
| Ingredient | Quantity | Notes and Alternatives |
|---|---|---|
| All-purpose flour | 2.5 cups (300g) | Cake flour for more delicate crumb; do not substitute with whole wheat |
| Granulated sugar | 2 cups (400g) | Use superfine sugar if available for finer texture |
| Unsweetened cocoa powder | 0.75 cup (75g) | Dutch-process for darker color; natural cocoa works fine |
| Baking powder | 2 teaspoons | Essential for rise; use fresh powder within 6 months |
| Baking soda | 0.5 teaspoon | Reacts with cocoa acidity; do not reduce |
| Table salt | 1 teaspoon | Enhances chocolate flavor; kosher salt works with volume adjustment |
| Large eggs | 3 eggs | Room temperature for better emulsification; cold eggs reduce rise |
| Whole milk | 1 cup (240ml) | 2% milk acceptable; almond milk reduces richness slightly |
| Unsalted butter | 0.5 cup (115g) softened | Room temperature essential; salted butter requires salt reduction |
| Vanilla extract | 2 teaspoons | Pure vanilla only; imitation reduces depth |
| Dark chocolate (70% cocoa) | 8 oz (225g) chopped | Higher cocoa percentage for sophisticated flavor |
| Heavy cream | 0.75 cup (180ml) | Must be 36% fat minimum; affects frosting stability |
| Unsalted butter for frosting | 0.25 cup (57g) | Added to chocolate ganache for spreadability |
| Black fondant | 1 lb (450g) | Store-bought or homemade; food coloring requires deep black shade |
| Powdered sugar (for fondant) | 2-3 tablespoons if making fondant | For rolling and dusting during fondant work |
| Confectioners’ glaze or clear piping gel | 2 tablespoons | Optional but recommended for fondant shine |
Image ALT: Minecraft cake recipe ingredients laid out including flour, cocoa powder, eggs, dark chocolate, and black fondant on white marble surface.
Step-by-Step Instructions
Phase 1: Prepare Your Workspace and Pans
- Preheat your oven to 350°F (175°C) and position the rack in the lower-middle position for even heat distribution.
- Grease two 8-inch (20cm) round cake pans with butter and line the bottoms with parchment paper circles.
- Dust the greased sides lightly with flour, tapping out excess to create an even non-stick surface.
- Gather all ingredients within arm’s reach to ensure smooth workflow during batter preparation.
Phase 2: Combine Dry Ingredients
- Sift together the all-purpose flour, sugar, cocoa powder, baking powder, baking soda, and salt into a large mixing bowl.
- Whisk the dry mixture for 30 seconds to incorporate air and distribute leavening agents evenly.
- Create a well in the center of the dry ingredients using the back of a wooden spoon.
Phase 3: Mix Wet Ingredients and Combine
- In a separate bowl, whisk together eggs, milk, softened butter, and vanilla extract until fully combined and slightly foamy.
- Pour the wet ingredients into the well of dry ingredients immediately.
- Fold gently with a rubber spatula using 15-20 strokes until just combined; do not overmix as this develops gluten and toughens the cake.
- The batter should have some small lumps remaining and pour thick but not stiff from your spatula.
Phase 4: Bake the Cake Layers
- Divide the batter evenly between prepared pans, smoothing the tops with an offset spatula.
- Tap each pan firmly on the counter three times to release large air bubbles.
- Bake for 32-35 minutes until a toothpick inserted in the center emerges with just a few moist crumbs.
- Cool the cakes in their pans for 10 minutes, then turn out onto wire cooling racks.
- Allow the cakes to cool completely to room temperature for at least 45 minutes before frosting or assembly.
Image ALT: Two chocolate cake layers cooling on wire racks showing perfectly risen domes with slight spring when touched.
Phase 5: Prepare the Chocolate Frosting
- Chop the dark chocolate into small, uniform pieces and place in a heat-safe bowl.
- Heat the heavy cream in a saucepan over medium heat until small bubbles form around the edges, approximately 2 minutes.
- Pour the hot cream over the chopped chocolate and let sit undisturbed for 1 minute to soften the chocolate.
- Whisk the chocolate and cream together until completely smooth and glossy.
- Stir in the butter in small pieces until fully incorporated and the frosting reaches a glossy, pourable consistency.
- Allow the frosting to cool to room temperature, stirring occasionally, until it reaches a thick spreadable texture (approximately 15-20 minutes).
Phase 6: Level and Assemble the Cake
- Using a serrated knife, carefully level each cake layer by slicing off the domed top in one smooth downward motion.
- Place the first cake layer on your serving plate or cake board, flat side up.
- Spread approximately 0.5 cup of the chocolate frosting evenly over the first layer using an offset spatula.
- Top with the second cake layer, flat side down, pressing gently to secure.
- Frost the top and sides of the assembled cake with the remaining chocolate frosting in an even, smooth layer.
Phase 7: Create the Minecraft Grid with Fondant
- Roll out the black fondant between two sheets of parchment paper to an 8-inch (20cm) square, 0.25 inch (6mm) thick.
- Using a ruler and a sharp knife or pizza cutter, cut the fondant into 64 equal squares (8 rows by 8 columns, each square 1 inch by 1 inch).
- Carefully transfer each fondant square onto the chocolate frosting in a grid pattern, pressing gently to adhere.
- Ensure spacing is consistent by measuring with a ruler or using a template guide made from cardboard.
- If any gaps appear, fill with additional small fondant pieces for visual continuity.
Phase 8: Final Touches and Setting
- Apply a light brush of confectioners’ glaze over the fondant squares for a polished, game-accurate appearance.
- Allow the cake to set at room temperature for 1-2 hours before slicing to ensure fondant hardens completely.
- Use a serrated knife dipped in hot water and wiped dry for clean slices that don’t drag the fondant.
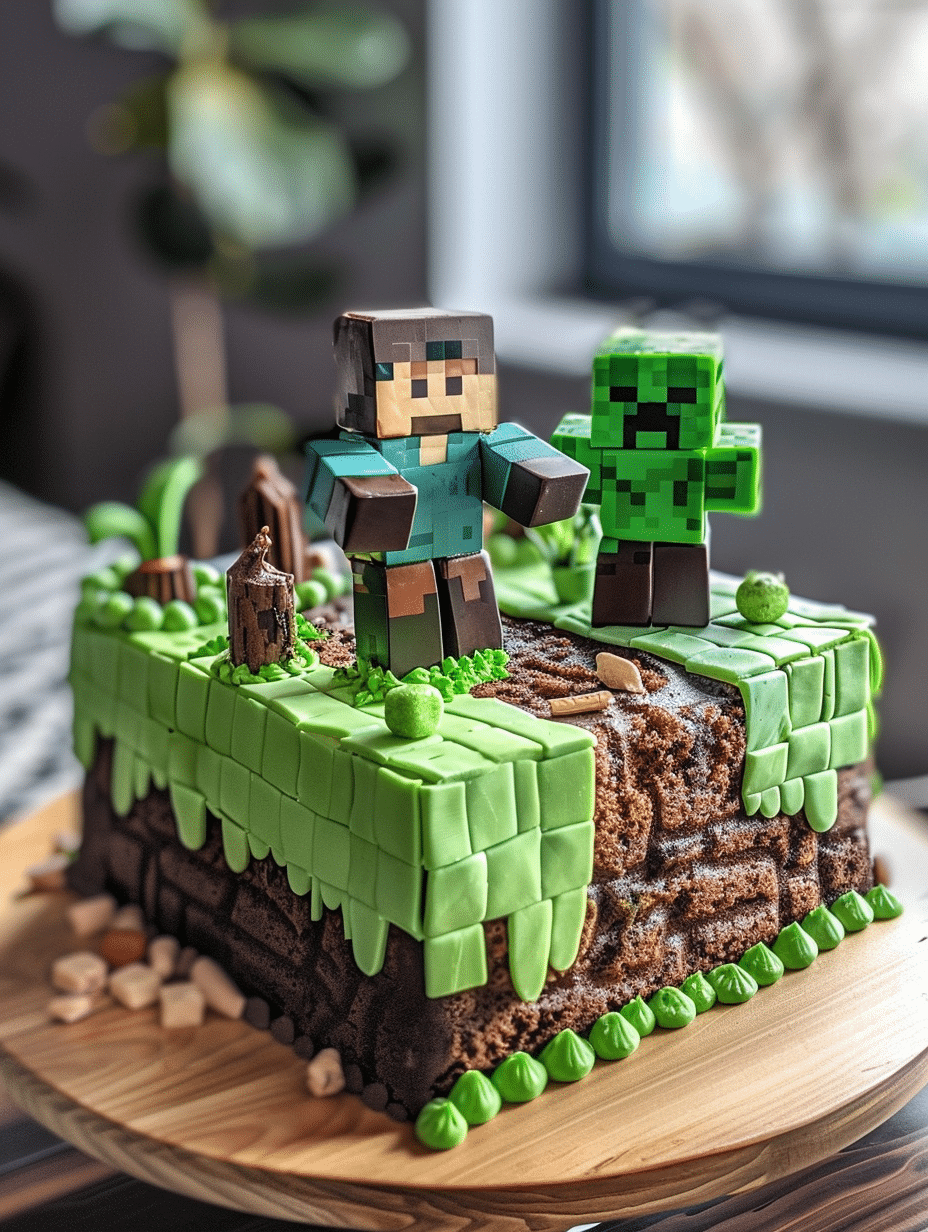
Image ALT: Finished Minecraft cake with black fondant squares arranged in perfect 8×8 grid pattern on chocolate frosting base.
Chef Tips for Perfect Results
- Measure fondant squares with precision: Use a ruler or printed grid template to ensure each square measures exactly 1 inch by 1 inch, which creates the authentic blocky Minecraft aesthetic rather than random sizes that look unprofessional.
- Chill the assembled cake before fondant application: Refrigerate the frosted cake for 30 minutes so the chocolate sets firmly and prevents fondant squares from sliding or sinking into soft frosting.
- Work with room-temperature fondant: If the fondant cracks when cutting, warm it slightly by kneading with your hands for 2-3 minutes, which increases pliability without making it greasy.
- Use a pizza cutter or rotary tool for straight lines: These tools cut fondant squares more cleanly than knives, which can drag and distort the edges, compromising the sharp grid appearance.
- Practice leveling before the actual cake: If you’ve never leveled cake layers before, test the technique on a practice cake first to prevent disasters on your show-stopper Minecraft cake.
- Apply glaze immediately after fondant placement: Brush the confectioners’ glaze onto fondant squares while the frosting is still slightly tacky, which helps the glaze adhere and creates the authentic pixelated shine that mirrors the game.
Common Mistakes to Avoid
Mistake 1: Overmixing the Batter
Overmixing develops gluten strands that make the cake tough and dense rather than tender and moist, completely undermining the delicate crumb you’re trying to achieve. I made this error repeatedly in my first attempts, resulting in Minecraft cakes that tasted rubbery and unpleasant despite perfect visual appearance. To fix this, fold the wet and dry ingredients together with just 15-20 gentle strokes using a rubber spatula; stop as soon as you see no streaks of flour.
Mistake 2: Insufficient Cooling Before Frosting
Applying frosting to warm cake layers causes it to melt and slide off unevenly, resulting in lumpy, unattractive coverage that can’t support the fondant grid properly. This happened during my third Minecraft cake attempt when I was impatient to move forward, and the entire fondant grid shifted when the warm cake continued cooling underneath the frosting. Always wait at least 45 minutes for complete cooling, and ideally chill the frosted cake for 30 minutes before applying fondant squares.
Mistake 3: Using Uneven Fondant Thickness
Cutting fondant squares at inconsistent thicknesses means some pieces pop off while others stick permanently, creating gaps and an incomplete Minecraft grid that looks amateur. The visual impact of the cake relies entirely on that uniform 8×8 grid, so cutting thickness directly affects the end result. Roll your fondant between two pieces of parchment to maintain exactly 0.25 inch thickness throughout, and use a ruler to measure depth periodically as you work.
Mistake 4: Neglecting Frosting Consistency
Chocolate frosting applied while still too warm will not support fondant, while frosting that’s too cold becomes impossible to spread smoothly without cracking the cake beneath. I discovered this issue when trying to rush the frosting cooling process by placing it in the freezer—the ganache crystallized and became lumpy, then warmed into pudding when I tried to use it. Allow the ganache to cool naturally at room temperature while stirring occasionally until it reaches spreadable consistency that holds peaks but flows when stirred.
Mistake 5: Cutting Fondant Squares Without a Guide
Attempting to cut the 8×8 grid freehand results in uneven square sizes, crooked lines, and a visually chaotic result that destroys the Minecraft cake’s appeal. Without a template, even careful home bakers find that squares drift slightly as they cut, creating gaps and misalignment. Create a simple cardboard template with 1-inch squares marked out, place it under your parchment paper during rolling, or use a ruler to mark light pencil lines on the fondant before cutting.
Variations and Substitutions
| Ingredient | Substitution | Impact on Flavor |
|---|---|---|
| Vanilla cake layers | Chocolate cake layers | Creates deeper chocolate flavor but reduces contrast with chocolate frosting; less visually striking |
| Dark chocolate 70% frosting | Milk chocolate frosting | Sweeter, less sophisticated profile; appeals more to children; less stable when warm |
| Black fondant grid | Green fondant grid (matching grass block) | Creates grass block design; achieves different Minecraft aesthetic with same technique |
| Black fondant grid | Multi-colored fondant squares (red, blue, yellow) | More playful and chaotic; requires precise color placement; more time-consuming assembly |
| Heavy cream in frosting | Coconut cream | Adds subtle coconut flavor; slightly thicker consistency; excellent for dairy-free diets |
| Whole milk in batter | Almond milk or oat milk | Reduces richness slightly; creates lighter crumb; acceptable substitution with minimal impact |
| All-purpose flour | Cake flour | Creates more delicate, tender crumb; less structure; recommended for advanced bakers |
Serving Suggestions and Pairings
This Minecraft cake shines as the centerpiece dessert at gaming-themed birthday parties, esports tournament celebrations, or casual gatherings of Minecraft enthusiasts of any age. Serve slices with cold milk or creamy vanilla ice cream, which balances the rich chocolate frosting perfectly and appeals to younger guests who might find the dark chocolate slightly bitter on its own. For adult audiences, pair this cake with strong black coffee or hot chocolate topped with whipped cream, which echoes the game’s cozy aesthetic.
The Minecraft cake works beautifully for video game-themed weddings or engagement parties if the couple shares gaming as a hobby—scale the recipe up to create a larger three-layer version and use custom fondant colors matching the couple’s favorite game blocks. For school gaming clubs, chess tournaments, or STEM celebration events, this dessert naturally fits the gamer and tech-enthusiast demographic while remaining sophisticated enough for formal occasions. Consider presenting the cake on a slate board or dark wooden platform decorated with additional fondant blocks scattered around the base, which reinforces the Minecraft theme and creates an impressive Instagram-worthy display.
Individual Minecraft cake slices package beautifully in clear cellophane bags tied with ribbon, making excellent party favors or bake sale items that stand out dramatically among conventional cupcakes. The visual novelty often makes these cakes conversation starters at potluck events where guests actually recognize the design and appreciate the builder’s effort.
Storage and Reheating
| Method | Duration | Instructions |
|---|---|---|
| Room temperature storage | 1-2 days | Cover cake loosely with a cake dome or tall bowl to prevent dust while allowing air circulation; keeps fondant crisp |
| Refrigerator storage | 5-7 days | Store in airtight container on shelf; allow 30 minutes room temperature rest before serving for best texture and flavor |
| Freezer storage | 2-3 months | Wrap individual slices in plastic wrap, then place in freezer bags with labels; thaw overnight in refrigerator before serving |
| Reheating individual slices | 30-60 seconds | Microwave slice on 50% power for 15-30 seconds if desired warm; room temperature serving is superior for texture |
| Transporting cake for events | 1-3 hours | Refrigerate cake until 1 hour before transport; place in sturdy cake carrier with non-slip mat to prevent sliding |
Image ALT: Minecraft cake with fondant squares maintained after 5 days of refrigeration storage showing no fondant discoloration or separation.
Nutritional Information
Approximate values per serving (1/14th of cake):
| Nutrient | Amount per Serving |
|---|---|
| Calories | 385 |
| Protein | 5g |
| Fat | 18g |
| Saturated Fat | 11g |
| Carbohydrates | 52g |
| Fiber | 2g |
| Sugars | 41g |
| Sodium | 285mg |
These values are approximate and vary based on specific brands and ingredient substitutions used in your Minecraft cake. The nutritional profile reflects the rich dark chocolate frosting and fondant covering, which contribute significantly to calorie and sugar content. Reducing fondant coverage or using lighter chocolate would decrease overall calories while maintaining the cake’s visual appeal.
Frequently Asked Questions
Can I make this Minecraft cake without fondant?
You can create a simplified Minecraft cake using chocolate frosting piped into a grid pattern with a piping bag fitted with a small round tip, though this method requires more precision and remains visible if the grid is imperfect. The fondant approach creates sharper, cleaner lines that read as intentionally geometric rather than hand-drawn, which better matches the blocky game aesthetic. If avoiding fondant, practice your piping technique on parchment paper first, then transfer the pattern to your frosted cake before serving.
How do I know when the cake is done baking?
Insert a toothpick or small knife into the center of each cake layer; it should emerge with just a few moist crumbs clinging to it, never completely clean or dripping with batter. At 350°F (175°C), the Minecraft cake layers typically bake for 32-35 minutes depending on your oven’s accuracy—every oven varies, so begin checking at 30 minutes. The cake should spring back when you gently press the surface with your fingertip, and the edges should pull slightly away from the pan sides.
Why did my fondant crack when I cut it?
Fondant cracks when it’s too cold, too dry, or being cut with a dull blade that drags rather than cleanly separating the material. Store fondant in an airtight container at room temperature rather than the refrigerator, and warm it slightly by kneading if it becomes brittle before cutting. Use a sharp pizza cutter or knife, or try cutting through parchment paper first and then peeling it away, which eliminates blade resistance.
Can I make this Minecraft cake the day before serving?
Yes, the Minecraft cake actually improves after sitting overnight, as the flavors meld and the cake becomes more moist and tender in refrigerator storage. Bake and cool the cake layers on day one, assemble with frosting on day one afternoon, then apply the fondant grid in the morning of day two for maximum fondant freshness. Store the completed cake in the refrigerator covered loosely, and remove it 30 minutes before serving to allow the cake to reach optimal texture and flavor.
What’s the best way to serve individual slices without ruining the fondant grid?
Use a long serrated knife dipped in hot water and wiped dry between each cut, which cleanly separates slices without dragging fondant or frosting. Slice through slowly in one smooth downward motion rather than sawing back and forth, which maintains the grid pattern’s integrity and creates visually appealing individual portions. If fondant squares do crack slightly, simply press them back into place with your finger while plating.
How far in advance can I prepare this Minecraft cake recipe for a party?
Prepare the cake layers up to 3 days ahead by wrapping them individually in plastic wrap and refrigerating until needed, which actually improves their moisture content when served fresh. Assemble the cake with frosting and fondant grid no more than 24 hours before serving for optimal fondant texture and appearance. Make the chocolate frosting ganache up to 5 days in advance and refrigerate until ready to use, then reheat gently over a water bath if it solidifies.
Conclusion
Building a Minecraft cake at home is entirely achievable when you follow this detailed recipe and understand the techniques behind each step. This spectacular dessert combines the moist, tender chocolate-vanilla sponge with dark chocolate frosting and that iconic 8×8 fondant grid that instantly transforms ordinary ingredients into recognizable art. Your next gaming celebration deserves this showstopping Minecraft cake centerpiece.
Minecraft Cake
Equipment
- two 8-inch round cake pans
- mixing bowls
- wire cooling rack
- offset spatula
- serrated knife
- Pizza Cutter for fondant squares
- ruler for measuring fondant grid
Ingredients
- 2.5 cups all-purpose flour
- 2 cups granulated sugar
- 0.75 cup unsweetened cocoa powder
- 2 tsp baking powder
- 0.5 tsp baking soda
- 1 tsp table salt
- 3 large eggs
- 1 cup whole milk
- 0.5 cup unsalted butter, softened
- 2 tsp vanilla extract
- 8 oz dark chocolate (70% cocoa), chopped
- 0.75 cup heavy cream
- 0.25 cup unsalted butter for frosting
- 1 lb black fondant
- 3 tbsp powdered sugar
- 2 tbsp confectioners glaze or clear piping gel
Instructions
- Preheat oven to 350°F (175°C) and prepare two 8-inch round cake pans with butter, parchment paper, and flour.
- Gather all ingredients and equipment before beginning.
- Sift together flour, sugar, cocoa powder, baking powder, baking soda, and salt in a large bowl.
- Whisk the dry ingredients thoroughly and create a well in the center.
- Whisk eggs, milk, softened butter, and vanilla extract in a separate bowl until combined.
- Pour wet ingredients into dry ingredients and fold gently until just combined.
- Divide batter evenly between prepared cake pans and smooth the tops.
- Tap pans on the counter to remove large air bubbles.
- Bake for 32-35 minutes until a toothpick comes out with a few moist crumbs.
- Cool cakes in pans for 10 minutes, then transfer to wire racks to cool completely.
- Place chopped dark chocolate in a heat-safe bowl.
- Heat heavy cream until small bubbles form around the edges.
- Pour hot cream over chocolate and let sit for 1 minute.
- Whisk until smooth, then stir in butter until glossy.
- Cool frosting until thick and spreadable.
- Level cake layers using a serrated knife.
- Place first cake layer on a serving board and spread frosting evenly over the top.
- Add the second cake layer and frost the top and sides completely.
- Roll black fondant into an 8-inch square approximately 1/4 inch thick.
- Cut the fondant into 64 equal squares arranged as an 8×8 grid.
- Arrange the fondant squares on top of the cake in an even Minecraft-style pattern.
- Apply confectioners glaze lightly over the fondant if desired.
- Allow cake to set for 1-2 hours before slicing and serving.
