
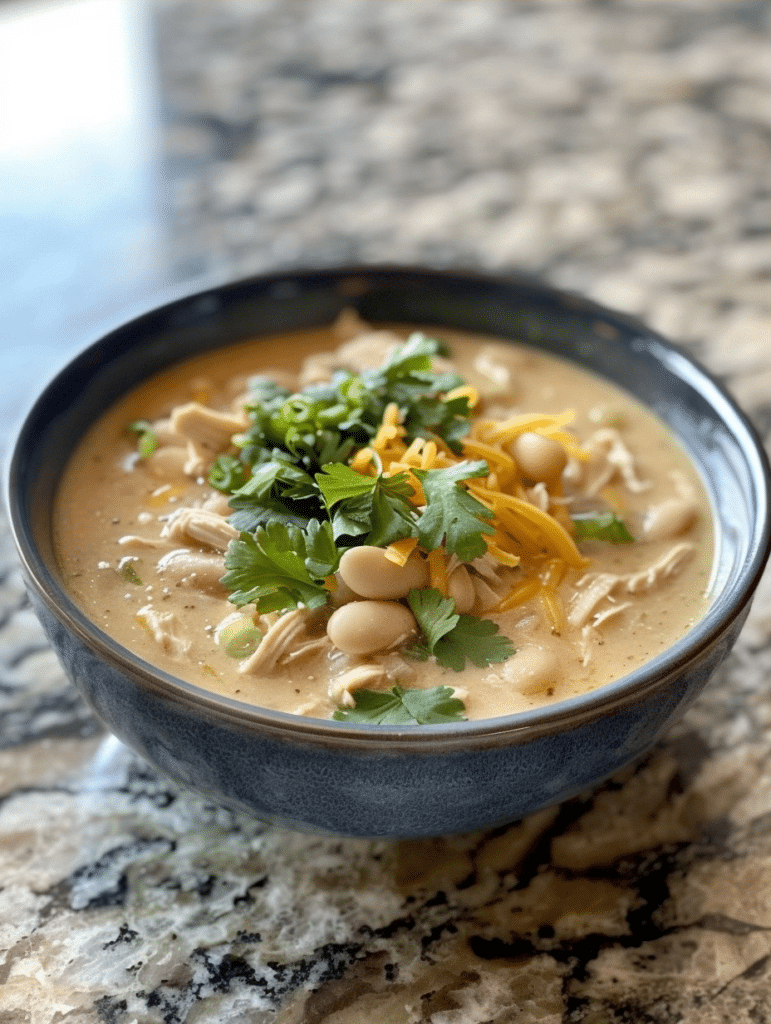
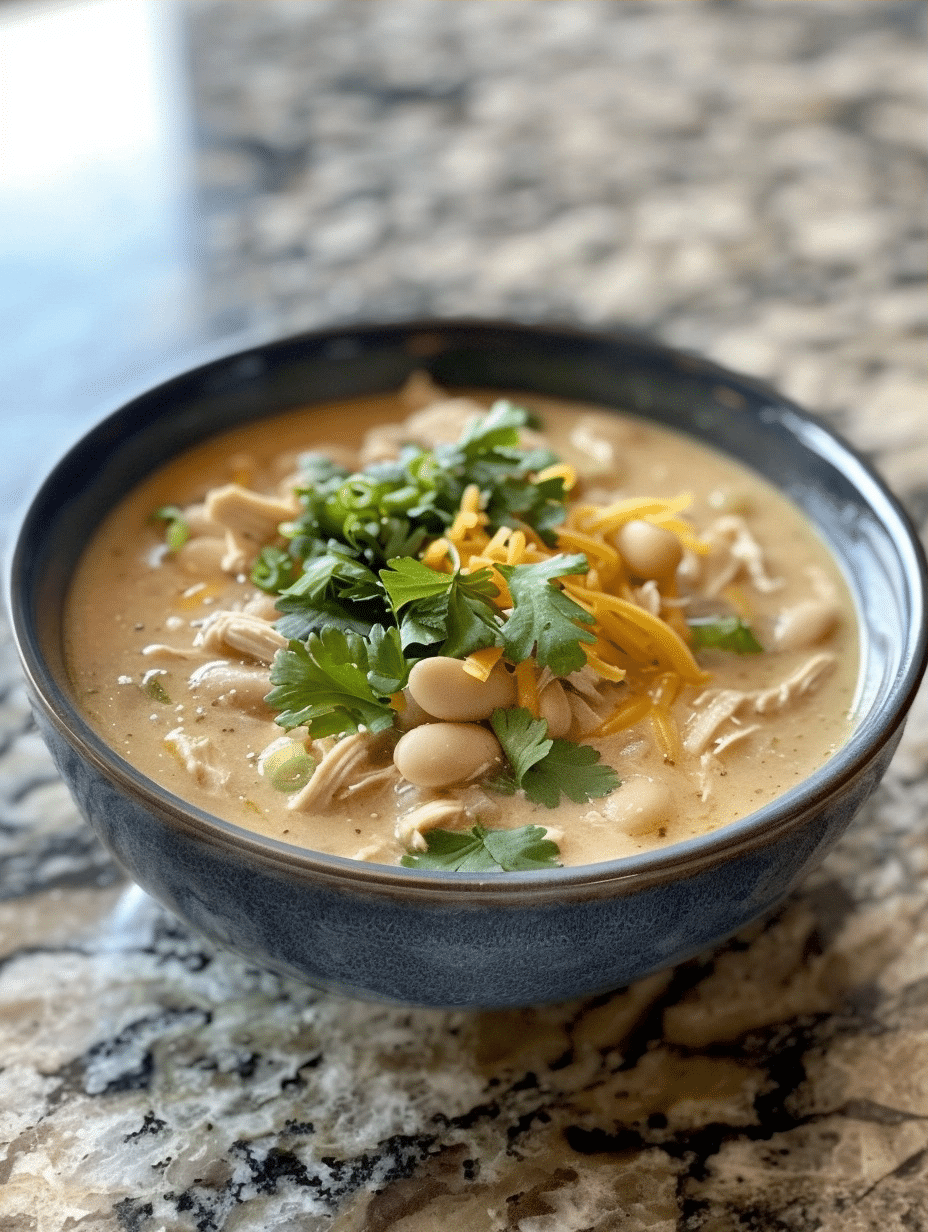
Instant Pot white chicken chili is a creamy, satisfying one-pot meal that combines tender chicken breast, hearty white beans, mild green chiles, and warming spices into a comforting bowl ready in under 30 minutes. This modern take on classic white chili skips the slow-simmering hours by using the Instant Pot’s high-pressure cooking, making weeknight dinners faster without sacrificing flavor or texture. The result is a restaurant-quality chili with a velvety cream base that tastes like it simmered all day but requires only minutes of active prep work.

About Me and This Recipe
I’m Eva Stoner, creator of Fresh Recipes Corner, where I share simple, reliable recipes for everyday cooking. My love for cooking began in my grandmother’s kitchen, where I learned that good food doesn’t have to be complicated—it just needs care, patience, and the right techniques. Those early moments shaped how I cook today and inspired me to keep things practical and approachable.
White chicken chili became a signature recipe in my kitchen about five years ago when I first purchased an Instant Pot. I was skeptical about pressure cooking until I realized how the rapid heat transforms tough cuts and builds flavor faster than traditional methods. This recipe emerged from countless Sunday afternoons testing ingredient ratios, finding the perfect balance of creaminess and spice that my family now requests weekly. The moment my teenage daughter asked for seconds without being prompted, I knew this version had earned its place in our regular rotation.
Recipe Overview
| Category | Details |
|---|---|
| Prep Time | 10 minutes |
| Cook Time | 15 minutes (plus 5-7 minutes to reach pressure) |
| Total Time | 30 minutes |
| Servings | 6 servings |
| Difficulty Level | Easy |
| Cuisine | American / Southwestern |
Why This Recipe Works
This instant pot white chicken chili works because it layers flavors systematically while respecting the Instant Pot’s unique cooking environment. Sautéing the onions and garlic first builds an aromatic foundation that transforms into deep, complex background notes when combined with the pressure-cooked chicken. The high-pressure environment breaks down the chicken’s fibers completely, creating meat so tender it shreds with a spoon, while simultaneously infusing it with the spices and broth flavors.
From my experience testing this recipe dozens of times, I discovered that adding beans after the first pressure cycle prevents them from turning to mush while still allowing them to absorb the chili’s flavors. The heavy cream goes in last for two critical reasons: heat protection and texture control. Adding cream before pressurizing risks curdling, while stirring it in at the end ensures a silky consistency that clings to every spoonful. The timing is so efficient that most home cooks can have dinner on the table faster than if they ordered takeout.
What sets this recipe apart from stovetop versions is the depth achieved in minimal time. Traditional white chicken chili simmers for 45 minutes to an hour, losing moisture and requiring frequent stirring. The Instant Pot’s sealed environment retains moisture and heat, creating an intensely flavored base in a fraction of the time. I’ve served this to skeptics who swore slow-cooked chili was superior, and nearly all admit this version matches or exceeds their expectations.
Ingredients
| Ingredient | Quantity | Notes and Alternatives |
|---|---|---|
| Boneless, skinless chicken breasts | 1.5 lbs | Cut into bite-sized pieces. Substitute with chicken thighs for darker, more flavorful meat, or use a rotisserie chicken (pre-cooked, add after pressure cycle). |
| Low-sodium chicken broth | 4 cups | Use quality broth for superior flavor. Bone broth adds extra richness. Vegetable broth works for a lighter version. |
| Canned white beans, drained and rinsed | 3 cans (15 oz each) | Great Northern or cannellini beans are ideal. Substitute with navy beans for creamier texture. Use dried beans if soaked overnight, increasing cook time. |
| Canned diced green chiles | 2 cans (4 oz each) | Mild or medium heat varieties available. Roasted fresh Poblano or Anaheim chiles add smokier depth but require roasting and dicing. |
| Yellow onion, diced | 1 large (about 1.5 cups) | Sweet onions add more sugar; use red onion for milder, sweeter notes. Always dice before sautéing for even cooking. |
| Garlic cloves, minced | 4 cloves | Fresh garlic required for best flavor. Do not substitute with garlic powder (use only 0.5 teaspoon if fresh is unavailable). |
| Ground cumin | 1.5 teaspoons | Toast cumin lightly before adding for enhanced aroma. Adjust down if sensitive to cumin’s earthiness. |
| Dried oregano | 1 teaspoon | Crush between fingers before adding to release oils. Mexican oregano offers more robust flavor; use sparingly (0.75 teaspoon). |
| Paprika | 0.5 teaspoon | Smoked paprika adds depth and subtle smoke. Sweet paprika is milder. Avoid hot paprika unless spice is desired. |
| Salt and black pepper | To taste | Add gradually and taste before serving. Start with 1 teaspoon salt and 0.25 teaspoon pepper, then adjust. |
| Heavy cream or half-and-half | 1 cup | Heavy cream creates richest texture. Half-and-half offers lighter option. Coconut cream provides dairy-free richness without altering flavor. |
| Olive oil | 2 tablespoons | Extra-virgin olive oil for better flavor. Avocado oil tolerates high heat equally well. |
| Fresh cilantro, chopped | 0.25 cup | Optional garnish adding brightness and freshness. Flat-leaf parsley offers milder herbal notes as substitute. |
Step-by-Step Instructions
Phase 1: Build the Flavor Base
- Turn on the Instant Pot using the Sauté function. Heat 2 tablespoons of olive oil until shimmering, approximately 1 minute. The oil should move easily across the pot’s surface and show faint wisps of smoke.
- Add the diced yellow onion and cook until softened and translucent, about 4 minutes, stirring occasionally with a wooden spoon. The onion will soften and release its natural sugars, creating a sweet, savory base.
- Stir in the minced garlic and cook for 30 seconds until fragrant, being careful not to let it burn. Fresh garlic aromatics will become noticeably stronger and fill the kitchen with an inviting scent.
- Add the chicken pieces to the pot and stir well to combine with the onion-garlic mixture. Sprinkle the cumin, oregano, and paprika evenly over the chicken, stirring constantly for 2 minutes to coat all pieces and activate the spices.
Phase 2: Pressure Cook
- Pour the chicken broth slowly into the pot while scraping the bottom with a wooden spoon. This deglazing action lifts all the flavorful browned bits (called fond) from the pot’s surface, incorporating them into the cooking liquid.
- Press the Cancel button to turn off the Sauté function immediately. Verify that the inner pot is seated properly and the bottom shows no stuck food particles.
- Close the Instant Pot lid securely and move the steam release valve to the Sealing position. Select the High Pressure setting and set the timer for 8 minutes. The pot will take 5 to 7 minutes to reach full pressure before the countdown begins.
Phase 3: Add Beans and Finish
- When the timer beeps, carefully move the steam release valve to the Venting position for quick-release. Stand back and allow steam to escape safely for approximately 1 minute. Once steam stops venting, open the lid by lifting the handle away from your body.
- Stir in the drained canned white beans and the green chiles with their liquid. Mix thoroughly to distribute evenly throughout the chili.
- Close the lid again, set the steam release valve to Sealing, and select High Pressure for 3 minutes. When the timer beeps, quick-release the pressure by venting, then open the lid carefully.
- Pour in the heavy cream while stirring constantly to ensure even distribution. The mixture will lighten in color and develop a silky appearance. Season with salt and black pepper to taste, starting conservatively.
- If desired for a hotter serving temperature, turn on the Sauté function for 2 minutes and stir occasionally. This step is optional but ensures the chili reaches a pleasant eating temperature.
- Ladle the chili into bowls and garnish with fresh cilantro, additional diced onion, shredded cheese, or a dollop of sour cream. Serve immediately while steam still rises from the bowls.
Chef Tips for Perfect Results
- Cut chicken into consistent sizes. Cutting all chicken pieces to roughly the same size (about 1-inch cubes) ensures they cook evenly. Smaller pieces cook faster and become more tender, while oversized pieces may remain tough. Uniformity is the key to perfectly cooked protein every time.
- Don’t skip the sauté phase. Sautéing onions and garlic develops their sweetness and creates fond on the pot’s bottom. This concentrated flavor layer transforms the entire chili from ordinary to extraordinary. The 2-3 minutes invested here pays dividends in final taste.
- Always deglaze properly. After adding spices and chicken, deglaze with broth by scraping the pot’s bottom vigorously. This step prevents burn-on and incorporates flavorful browned bits that create depth. Failure to deglaze results in flat-tasting chili and potential burn warnings.
- Quick-release after the first pressure cycle. Quick-releasing pressure after cooking chicken allows you to add beans for the second cycle. This two-step pressure method prevents beans from becoming mushy while maximizing flavor absorption. Never skip this intermediate release step.
- Add cream after pressure cooking only. Dairy products can curdle under pressure or scorch on the pot bottom. Always stir in heavy cream after all pressure cooking completes. This timing protects the cream’s texture and prevents the chili from developing off-flavors.
- Taste and adjust seasoning at the end. The amount of salt needed varies based on broth brand and personal preference. Taste before serving and adjust seasoning gradually. This final tasting step is your quality control checkpoint.
Common Mistakes to Avoid
Mistake 1: Not sautéing aromatics before pressure cooking. Skipping the sauté phase results in flat, one-dimensional flavor. The Maillard reaction that occurs during sautéing creates hundreds of new flavor compounds that pressure cooking alone cannot replicate. Fix: Always sauté onions until translucent and garlic until fragrant before adding other ingredients.
Mistake 2: Adding cream or dairy before pressure cooking. Heavy cream will curdle under high pressure and may scorch on the pot bottom, creating burnt flavors throughout the chili. Additionally, the Instant Pot may display a burn warning. Fix: Reserve all dairy additions for after pressure cooking completes, stirring in gently during the final stage.
Mistake 3: Adding beans during the initial chicken pressure cycle. Beans require less cooking time than chicken. Adding them together results in mushy, disintegrating beans that break apart when stirred. The beans over-cook and release excess starch, creating a gummy texture. Fix: Cook chicken first for 8 minutes on high pressure. Quick-release, add beans, and pressure cook for only 3 additional minutes.
Mistake 4: Not deglazing the pot. Skipping the deglazing step after browning chicken and spices leaves flavorful browned bits stuck to the pot bottom. These concentrated flavor compounds are wasted, and the chili tastes less savory and complex. Additionally, bits may burn during pressure cooking. Fix: Always scrape the pot bottom thoroughly with a wooden spoon after adding broth, lifting every bit of fond into the liquid.
Mistake 5: Using pre-shredded cheese for garnish. Pre-shredded cheese contains anti-caking agents that prevent melting smoothly and create a grainy texture when stirred into hot chili. Fresh-grated cheese melts evenly and integrates beautifully. Fix: Grate cheese directly from the block just before serving, or offer it as a topping rather than stirring into the pot.
Variations and Substitutions
| Original Ingredient | Substitution | Impact on Flavor |
|---|---|---|
| Boneless, skinless chicken breast | Boneless chicken thighs (same weight) | Creates deeper, richer flavor with more savory notes. Thighs remain tender longer, so reduce high-pressure time to 6 minutes to prevent mushiness. |
| Canned green chiles | Fresh roasted Poblano or Anaheim peppers | Adds smoky, charred depth. Requires roasting, cooling, and dicing. Increases prep time by 10 minutes but elevates overall complexity significantly. |
| Great Northern beans | Cannellini beans or navy beans | Cannellini beans are similar in texture and flavor, creating no noticeable change. Navy beans create creamier texture as they release more starch during cooking. |
| Chicken broth | Vegetable broth or chicken stock | Vegetable broth creates lighter, fresher-tasting version. Stock made from bones adds gelatin and deeper umami but may require additional salt. |
| Heavy cream | Half-and-half or Greek yogurt | Half-and-half reduces richness but maintains creaminess. Greek yogurt (stirred in slowly while heating) offers tangy edge and protein boost; use 0.75 cup Greek yogurt. |
| Fresh cilantro garnish | Flat-leaf parsley or chives | Parsley offers milder, more subtle herbal notes. Chives provide oniony freshness. Neither has cilantro’s distinctive peppery quality but still add brightness. |
| Cumin (1.5 tsp) | Increase to 2 teaspoons or add 0.5 tsp smoked cumin | Creates earthier, more pronounced Southwestern flavor. Use incrementally as over-cumin becomes harsh. Add in stages and taste as you go. |
| Paprika (0.5 tsp) | Switch to smoked paprika or add 0.25 tsp cayenne | Smoked paprika adds subtle smokiness. Cayenne introduces gentle heat without overwhelming other flavors. Start with cayenne sparingly. |
Serving Suggestions and Pairings
Instant Pot white chicken chili pairs beautifully with cornbread, especially thick-cut wedges with honey butter that provide textural contrast and slight sweetness. Serve alongside a simple garden salad dressed with lime vinaigrette to cut through the cream’s richness and add refreshing brightness. Crusty sourdough bread or garlic bread works wonderfully for scooping every last drop of creamy chili from bowls.
For a complete meal, offer toppings on the side: shredded sharp cheddar cheese, diced red onion, fresh cilantro, sliced jalapeños for heat, crushed tortilla chips for crunch, and sour cream or Mexican crema for cooling contrast. This build-your-own approach appeals to various spice tolerances and dietary preferences.
This chili excels at casual entertaining occasions like weeknight family dinners, neighborhood potlucks, or game-day gatherings. The recipe serves six generously, scaling easily if doubling in a larger Instant Pot (use 6 cups broth instead of 4, increase protein to 2.5 lbs, and extend first pressure cycle to 10 minutes). It’s also perfect for meal-prep Sundays, providing ready-to-heat portions throughout the week.
For special occasions, serve in bread bowls: hollow out round sourdough loaves and ladle chili inside for an impressive, edible presentation. Or offer as a taco filling with shredded cheese and coleslaw in warm flour tortillas for a Southwestern twist.
Storage and Reheating
| Storage Method | Duration | Instructions |
|---|---|---|
| Refrigerator | Up to 4 days | Cool chili to room temperature, approximately 1 hour. Transfer to airtight containers, leaving 1 inch of headspace. Store on refrigerator’s middle shelf away from the back wall where it freezes fastest. |
| Freezer | Up to 3 months | Cool completely before freezing to prevent ice crystals. Use freezer-safe containers or zip-top bags, leaving 1 inch headspace for expansion. Label with date. Lay flat bags in freezer to maximize space. |
| Thaw overnight in refrigerator | 8-12 hours | Transfer frozen chili from freezer to refrigerator the night before serving. This gradual thawing prevents separation and maintains creamy texture. |
| Stovetop reheating | 10-15 minutes | Place chili in saucepan over medium-low heat. Stir frequently to ensure even heating. Add small amounts of broth if chili appears too thick, as it concentrates during storage. Heat until steam rises from surface. |
| Instant Pot reheating | 3-5 minutes | Add thawed chili to Instant Pot using Sauté function. Stir occasionally until heated through. Do not use pressure function for reheating as it will further thicken the chili. |
| Microwave reheating | 5-8 minutes | Transfer desired portion to microwave-safe bowl. Heat on 50% power in 2-minute intervals, stirring between intervals. Lower power prevents cream from scorching. Full power causes uneven heating and potential boiling. |
Nutritional Information
| Nutrient | Amount per Serving |
|---|---|
| Calories | 385 |
| Protein | 38g |
| Total Fat | 12g |
| Saturated Fat | 5g |
| Trans Fat | 0g |
| Cholesterol | 92mg |
| Total Carbohydrates | 28g |
| Dietary Fiber | 6g |
| Total Sugars | 3g |
| Sodium | 920mg |
| Potassium | 685mg |
| Calcium | 185mg |
| Iron | 3mg |
Approximate values based on USDA database and ingredient tracking. Actual nutrition varies based on specific brands and preparation methods. Consult a registered dietitian for personalized dietary information.
Frequently Asked Questions
Can I use frozen chicken breasts in this instant pot white chicken chili?
Yes, frozen chicken breasts work excellently in this recipe with one adjustment: increase the high-pressure cooking time to 12 minutes instead of 8 minutes. The Instant Pot’s heat penetrates frozen chicken, and the extended time ensures complete thawing and thorough cooking. Frozen chicken may release additional liquid, so check consistency when adding cream and reduce quantity slightly if too thin.
How do I know when the white chicken chili is done cooking?
The chili is done when the Instant Pot beeps at the end of the pressure cycle and the chicken shreds easily with a spoon or fork. After quick-releasing pressure and opening the lid, pierce a piece of chicken with a knife; no pink should remain in the center. If any pink remains, close the pot, pressure cook for 2 additional minutes, and quick-release again.
What if my chili appears too thick or too thin?
If the chili is too thin after adding cream, turn on the Sauté function and let it simmer uncovered for 5-10 minutes, allowing excess liquid to evaporate. If the chili is too thick, stir in additional broth or cream one-quarter cup at a time until reaching desired consistency. Thickness varies based on bean size and broth brand, so adjusting at the end is normal.
Can I make this white chicken chili recipe ahead of time?
Absolutely, this chili is ideal for make-ahead preparation. Prepare completely through step 11 (adding cream), cool to room temperature, and refrigerate in airtight containers for up to 4 days. Reheat gently on the stovetop or in the Instant Pot’s Sauté function, adding extra broth if needed. The flavors deepen as the chili sits overnight, making next-day servings even more delicious.
What are good substitutes for canned green chiles in white chicken chili?
Fresh roasted Poblano or Anaheim peppers create smokier depth; roast over an open flame until charred, cool in a plastic bag, peel off skin, and dice. Mild jalapeños offer fresher heat if using only 1 cup diced. Bell peppers provide sweetness without heat. For more spice, substitute with diced New Mexico chiles or add 0.25 teaspoon cayenne pepper to the spice blend.
Is this white chicken chili suitable for meal prep and freezing?
Yes, this chili freezes beautifully for up to 3 months in freezer-safe containers or zip-top bags. Allow to cool completely before freezing to prevent ice crystal formation. Thaw overnight in the refrigerator before reheating on the stovetop, ensuring gentle heat to prevent cream from separating. Proper freezing and thawing maintains the creamy texture and flavor integrity perfectly.
Conclusion
Instant Pot white chicken chili delivers restaurant-quality comfort in 30 minutes with minimal effort. The creamy, satisfying flavors and tender chicken make this dish perfect for busy weeknights, special occasions, or meal prep. Master the simple technique of sautéing aromatics, pressure cooking in stages, and adding cream last, and you’ll create this beloved recipe again and again. The first spoonful of warm, silky chili with its harmonious blend of green chiles, cumin, and oregano never fails to satisfy.
Instant Pot White Chicken Chili
Ingredients
- 2 boneless, skinless chicken breasts
- 2 cups chicken broth (low-sodium)
- 1 cup white beans (canned or cooked, drained)
- 1 (4 oz) can mild green chiles, drained
- 1 medium onion, diced
- 3 cloves garlic, minced
- 2 tbsp olive oil
- 2 tbsp diced jalapeños (optional)
- 1 tsp ground cumin
- 1/2 tsp dried oregano
- 1 bay leaf
- Salt and pepper to taste
- 1/2 cup heavy cream
- Fresh cilantro or green onions for garnish
Instructions
- Heat olive oil in the Instant Pot using the 'Sauté' function
- Add diced onion and sauté until translucent
- Stir in minced garlic and jalapeños; cook 1 minute
- Add chicken breasts, salt, pepper, cumin, oregano, and bay leaf
- Pour in chicken broth and chiles
- Close lid with valve released, set to 'High Pressure' and cook for 10 minutes
- Quick release pressure when chicken is done
- Remove and shred chicken using a fork
- Return chicken to pot, stir in white beans and heavy cream
- Season to taste and serve warm with cilantro or green onions
Notes
Chili thickens as it cools; add more broth if needed
Add kale or spinach in final 2 minutes for extra nutrition
Store leftovers in an airtight container for 3-4 days
Freeze up to 2 months without cream
