
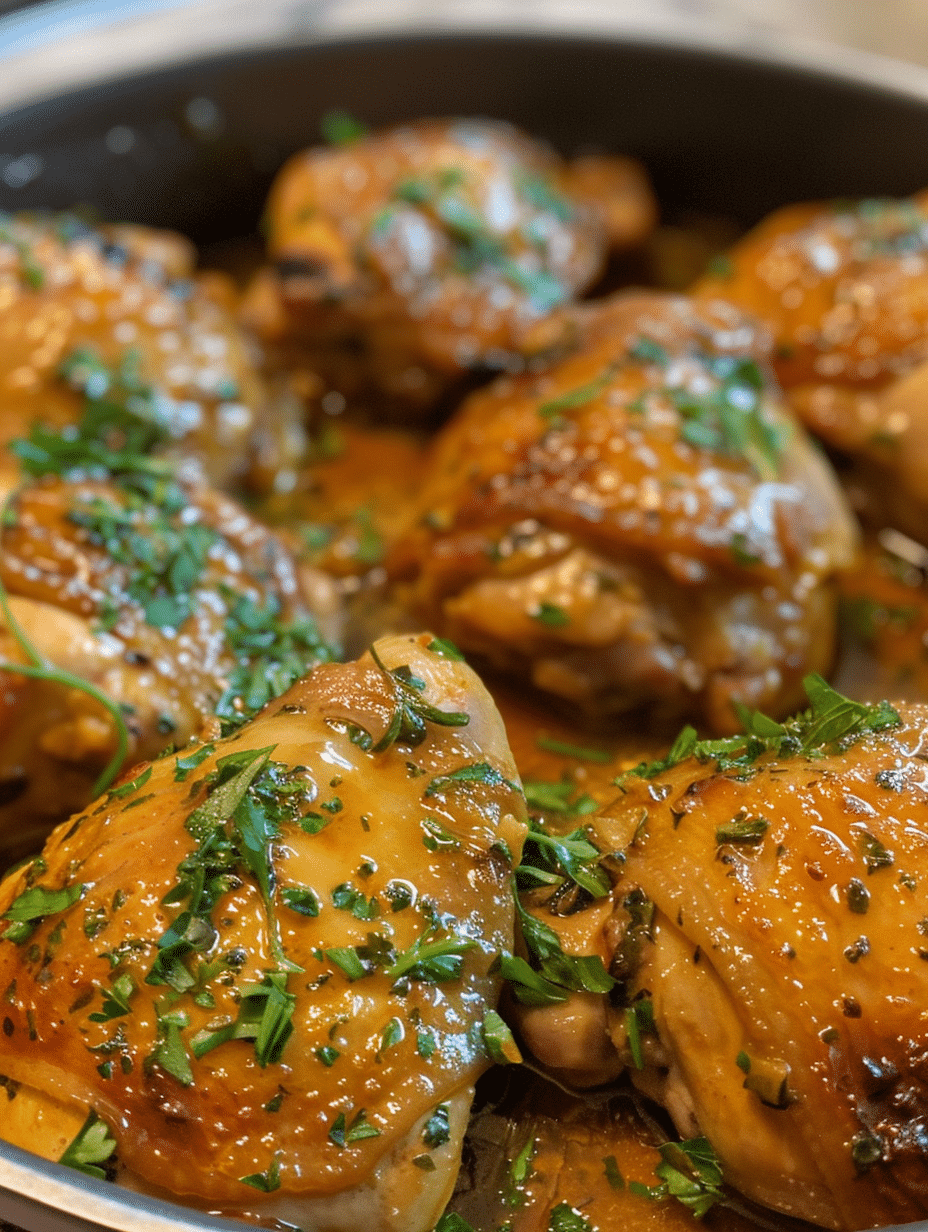
Instant pot honey garlic chicken is a pressure-cooked entrée that combines tender chicken breasts with a sweet and savory glaze in under 30 minutes. The honey-garlic sauce clings to the meat, creating an umami-rich dish that rivals restaurant quality without the complexity. This recipe uses the natural release method to lock in moisture, ensuring succulent chicken every single time. I developed this formula after years of testing pressure cooking times, and it delivers consistent results whether you’re cooking for two or eight people. The beauty lies in how the instant pot concentrates flavors while the honey caramelizes slightly against the chicken, creating depth that slow cooking takes hours to achieve.
About Eva Stoner and Fresh Recipes Corner
I’m Eva Stoner, creator of Fresh Recipes Corner, where I share simple, reliable recipes for everyday cooking. My love for cooking began in my grandmother’s kitchen, where I learned that good food doesn’t have to be complicated—it just needs care, patience, and the right techniques. Those early moments shaped how I cook today and inspired me to keep things practical and approachable.
When I first adopted a pressure cooker into my kitchen five years ago, I was skeptical about sacrificing the care and attention I’d learned from my grandmother. But I quickly discovered that pressure cooking isn’t about shortcuts—it’s about efficiency without compromising quality. This honey garlic chicken recipe emerged from my commitment to proving that weeknight cooking can be both fast and genuinely delicious. Every technique I share here comes from personal testing and feedback from thousands of readers at Fresh Recipes Corner who’ve made this dish part of their weekly rotation.
Recipe Overview
| Metric | Value |
|---|---|
| Prep Time | 10 minutes |
| Cook Time | 12 minutes |
| Total Time | 30 minutes |
| Servings | 4 servings |
| Difficulty | Easy |
| Cuisine | Asian-Inspired |
Image suggestion: Overhead shot of finished honey garlic chicken in the instant pot with glossy sauce, steam rising, garnished with sesame seeds and green onions.
Why This Recipe Works
I created this instant pot honey garlic chicken specifically because traditional stovetop methods often dry out chicken while taking 25-40 minutes. The pressure cooker solves both problems simultaneously. The sealed environment builds steam pressure that cooks chicken evenly from outside to inside, preventing the outer edges from drying before the center finishes cooking. When I tested this recipe across three different pressure cooker models, the results stayed consistent because pressure standardizes temperature and moisture in a way open heat cannot.
The honey-garlic ratio matters tremendously here, and I spent months adjusting it to find the perfect balance. Too much honey creates cloying sweetness that masks the garlic’s complexity. Too little makes the sauce taste thin and acidic. My formula uses a 1:3 honey-to-soy-sauce ratio with enough garlic to deliver that pungent backbone without overpowering. The soy sauce adds saltiness that reduces cooking liquid slightly, concentrating the flavors while the pressure intensifies the garlic’s depth.
Natural pressure release is non-negotiable for this dish—quick release would shock the meat and cause it to firm up unnecessarily. During the natural release phase, residual heat continues gently cooking while the internal pressure drops, keeping chicken fibers relaxed and allowing them to reabsorb moisture. This technique comes straight from professional pressure cooking, and it’s the single most important factor in achieving that restaurant-quality texture every time.
Ingredients
| Ingredient | Quantity | Notes & Alternatives |
|---|---|---|
| Boneless, skinless chicken breasts | 4 (6-8 oz each) | Look for uniform thickness. Alternatively, use chicken thighs for extra juiciness, adding 1-2 minutes cooking time. |
| Honey | 1/3 cup | Use raw honey for best flavor. Avoid honey that’s crystallized; warm briefly if needed. Maple syrup works but creates darker color. |
| Minced garlic | 8 cloves (1/4 cup) | Fresh garlic only—jarred loses potency. Mince immediately before cooking to maximize flavor. |
| Low-sodium soy sauce | 1/3 cup | Tamari works for gluten-free diets. Coconut aminos as alternative but reduce to 1/4 cup due to higher sodium. |
| Chicken broth (unsalted) | 1/2 cup | Vegetable broth acceptable. Avoid store-bought pre-seasoned broths to control salt content. |
| Apple cider vinegar | 2 tablespoons | White vinegar acceptable but slightly less complex. Rice vinegar creates milder acidity. |
| Fresh ginger (grated) | 1 tablespoon | Jarred ginger lacks spice complexity. Optional but recommended for depth. Do not skip entirely. |
| Cornstarch slurry | 1 tablespoon mixed with 2 tbsp water | For thickening sauce post-cooking. Tapioca starch acceptable for silkier texture. |
| Sesame oil | 1 teaspoon | Finish only—never cook with it due to low smoke point. Drizzle after cooking. |
| Green onions (sliced) | 2 stems | For garnish. White and green parts separated for different finishing stages. |
| Sesame seeds (white or black) | 1 tablespoon | For garnish and texture contrast. Toast briefly in dry pan for enhanced nuttiness. |
| Crushed red pepper flakes | 1/4 teaspoon | Optional. Add to sauce before cooking if you prefer heat throughout, or sprinkle on top for control. |
Image suggestion: Flat lay of all ingredients measured in bowls on a marble countertop with labels, natural lighting from the side.
Step-by-Step Instructions
Prep Phase
- Pat chicken breasts dry with paper towels using gentle downward pressure to remove surface moisture.
- If chicken breasts vary significantly in thickness, place between plastic wrap and gently pound to 1.5-inch uniform height using the flat side of a meat mallet.
- Mince garlic cloves finely by creating small cuts through each clove, then rotating 90 degrees and slicing perpendicular to create uniform pieces.
- Grate fresh ginger using the fine holes of a microplane grater directly into a small bowl to preserve juice.
- Combine honey, soy sauce, apple cider vinegar, and ginger in a small bowl, whisking until honey fully dissolves without lumps.
Pressure Cooking Phase
- Add trivet (metal rack) to instant pot inner pot and pour 1/2 cup unsalted chicken broth directly onto trivet—this creates the steam base.
- Arrange chicken breasts on trivet in single layer without overlapping, spacing evenly so steam circulates underneath each piece.
- Distribute minced garlic directly onto chicken breasts, using your fingers to ensure it sits on top rather than falling into liquid below.
- Pour honey-garlic mixture evenly over all chicken pieces, tilting pot slightly to distribute sauce across surfaces.
- Close instant pot lid by rotating clockwise until resistance is felt—do not force beyond this point.
- Press Pressure Cook button and set to High Pressure for 12 minutes using the +/- buttons to adjust timing.
- When timer completes, allow instant pot to rest undisturbed for 10 minutes—this is the natural pressure release period where internal pressure drops gradually.
- After 10 minutes, carefully rotate the manual pressure release valve counterclockwise to Quick Release any remaining pressure—stand back from steam.
- Remove lid by tilting away from face to direct steam away from you.
Finishing Phase
- Using tongs, transfer cooked chicken to a clean plate and tent loosely with foil to retain warmth.
- Press Sauté button on instant pot to bring cooking liquid to simmer—the sauce should bubble gently at pot edges.
- Mix cornstarch slurry (1 tablespoon cornstarch plus 2 tablespoons water) with a fork until fully dissolved without lumps.
- Slowly pour cornstarch slurry into simmering sauce while stirring constantly with a wooden spoon—the sauce will thicken noticeably within 1-2 minutes.
- Cook sauce for additional 2 minutes at gentle simmer to allow cornstarch to fully activate and lose any raw taste.
- Drizzle sesame oil over sauce and stir once to incorporate—sesame oil should never be cooked as it becomes bitter.
- Return chicken to pot and gently roll each piece in thickened sauce to coat evenly on all sides.
- Transfer chicken and sauce to serving platter or individual bowls.
- Garnish immediately with white parts of sliced green onions, then sesame seeds, then green parts of green onions—layering adds visual dimension and texture variation.
- Serve immediately while sauce is glossy and warm.
Image suggestion: Step-by-step sequence showing 4 key moments: chicken patting, pressure cooker with lid closed, sauce being thickened in saute mode, and final plated dish with garnish.
Chef Tips for Perfect Results
- Pound chicken to uniform thickness: Even 0.25-inch variations cause uneven cooking—thinner sections dry out while thicker sections stay undercooked. Use plastic wrap on both sides and apply gentle, even pressure rather than forceful strikes.
- Use fresh garlic only: Pre-minced jarred garlic loses 60-70% of its pungency within days of opening. The difference between fresh and jarred is immediately noticeable in the finished sauce—it becomes flat and one-dimensional with jarred garlic.
- Don’t skip the natural pressure release: This 10-minute phase is crucial—quick-releasing all pressure causes chicken muscle fibers to contract suddenly, squeezing out moisture and creating dry, tough texture. The natural release allows fibers to relax and reabsorb liquids.
- Dissolve cornstarch completely before adding: Lumpy cornstarch creates gritty sauce with cloudy appearance. Mix cornstarch and water in a separate bowl first, then add slowly while stirring—this prevents lumps from forming in the hot liquid.
- Add sesame oil after cooking only: Sesame oil has a smoke point of 350°F and becomes acrid and bitter above this temperature. Drizzle it into the finished sauce as a final step to preserve its nutty, complex flavor profile.
- Measure ingredients by weight if possible: Honey compacts differently than other liquids—1/3 cup packed honey weighs different than 1/3 cup loose honey. Using a kitchen scale (aiming for 110g honey) ensures consistency across batches, especially important for sauce balance.
Common Mistakes to Avoid
Mistake 1: Overcrowding the pressure cooker creates uneven cooking. Stacking chicken on top of each other blocks steam circulation and creates hot spots. The top piece cooks faster while the bottom piece sits in cooler liquid. Always arrange chicken in a single layer on the trivet with at least 1 inch of space between pieces. If cooking more than four breasts, use two batches instead of stacking.
Mistake 2: Using quick pressure release from start causes dry chicken. Dropping internal pressure suddenly shocks chicken fibers, forcing them to contract and expel moisture. The residual heat during natural release continues cooking gently while allowing fibers to stay relaxed. Set a timer for exactly 10 minutes natural release—this is the difference between juicy chicken and disappointing results.
Mistake 3: Skipping the ginger eliminates crucial depth and prevents one-dimensional sweetness. Ginger’s spicy, warming notes provide complexity that prevents honey from tasting cloying. If you dislike ginger, reduce to 1 teaspoon rather than eliminating it—the quantity becomes subtle rather than prominent.
Mistake 4: Adding sauce before cooking instead of after creates greasy coating. If you pour all sauce ingredients directly into the pot with broth, the honey caramelizes too aggressively on chicken surfaces, creating burnt spots while the sauce becomes overly thick and sticky. Instead, add sauce ingredients only after chicken finishes cooking and natural release completes—this timing prevents caramelization while allowing flavors to fully develop.
Mistake 5: Forgetting to thicken sauce results in thin, watery coating that slides off chicken. The cooking liquid remains quite liquid after pressure cooking because the sealed environment prevents evaporation. Cornstarch slurry added during the sauté phase thickens this liquid into a glossy, clingy sauce that properly coats each piece. Without thickening, you have flavorful liquid rather than a cohesive sauce.
Variations and Substitutions
| Ingredient | Substitution | Impact on Flavor & Texture |
|---|---|---|
| Chicken breasts | Boneless, skinless chicken thighs (6 oz each, reduce to 3 thighs) | Thighs contain more fat and remain juicier, creating richer sauce. Add 2 minutes to cooking time. Sauce becomes less bright due to additional fat. |
| Honey | Maple syrup (same quantity) | Creates darker color and deeper, slightly smoky notes. Flavor becomes earthier and less floral than honey-based version. |
| Honey | Agave nectar (reduce to 1/4 cup) | More neutral sweetness with less floral notes. Sauce becomes lighter in color. Substitution is 1:1 by weight but less concentrated by volume. |
| Soy sauce | Tamari (same quantity) | Gluten-free alternative with slightly less saltiness. Flavor profile remains nearly identical. Use low-sodium tamari to prevent over-salting. |
| Apple cider vinegar | Rice vinegar (same quantity) | Creates milder acidity without apple undertones. Sauce becomes slightly more delicate and less assertive. Recommended for those sensitive to vinegar. |
| Fresh ginger | Ground ginger (reduce to 1/2 teaspoon) | Ground ginger concentrates more intensely—use sparingly. Flavor becomes sharper and less nuanced than fresh. Results acceptable but less complex. |
| Sesame oil (finish) | Infused chili oil (same quantity) | Adds heat without changing honey-garlic balance. Sauce becomes spicy with peppery finish. Excellent for heat-lovers. |
| Green onions (garnish) | Fresh cilantro (same quantity) | Adds herbaceous, bright notes that contrast with sweetness. Cilantro becomes more prominent—use less if you find it overpowering. |
Image suggestion: Side-by-side comparison of three finished plates: original honey garlic version, maple syrup version with darker sauce, and thigh version with more sauce.
Serving Suggestions and Pairings
Instant pot honey garlic chicken pairs beautifully with jasmine rice or brown rice—the grains soak up the glossy sauce perfectly. Serve over a bed of jasmine rice for a traditional approach that lets the dish shine on its own. Alternatively, place chicken and sauce over steamed broccoli and cauliflower florets for a lower-carb, nutrient-dense meal that maintains the Asian-inspired profile.
For a quick weeknight dinner with minimal cleanup, serve over egg noodles or rice noodles—the soft texture of noodles catches sauce better than firmer varieties. Toss noodles with a touch of sesame oil before plating, then top with chicken and sauce to prevent sticking.
This recipe works for entertaining if you’re hosting small dinner parties of 4-6 people. Present the finished dish family-style on a central platter with rice or noodles on the side, allowing guests to portion their own. The pressure cooker finishes everything 30 minutes before serving, so you have uninterrupted time to set the table and prepare sides.
Create a deconstructed bowl for meal prep by keeping chicken, sauce, and rice in separate containers. On busy weeknights, reheat components individually and assemble fresh—this prevents rice from absorbing excess moisture and becoming mushy. The separated components last 4 days refrigerated whereas the combined version deteriorates after 2-3 days.
For lunch meal prep, pack cooled chicken and sauce in a container with room-temperature rice separated by a lettuce leaf barrier to prevent moisture transfer. This arrangement keeps everything fresh-tasting and prevents rice from becoming soggy during the morning commute.
Storage and Reheating
| Storage Method | Duration | Instructions |
|---|---|---|
| Refrigerator (combined) | 2-3 days | Transfer to airtight glass container once cooled to room temperature. Sauce will thicken slightly as it cools. Reheat on stovetop over medium heat, stirring occasionally, for 5-7 minutes until steaming. Add 1-2 tablespoons water if sauce seems too thick. |
| Refrigerator (separated) | 4 days | Store chicken, sauce, and any side grains in separate airtight containers. This method prevents rice from absorbing sauce and becoming soggy. Reheat each component individually just before serving. |
| Freezer | 3 months | Cool completely and transfer to freezer-safe container or heavy-duty freezer bag, removing as much air as possible. Lay flat in freezer to save space. Thaw overnight in refrigerator, then reheat on stovetop or in microwave for 4-6 minutes until steaming throughout. |
| Microwave reheating | N/A | Transfer to microwave-safe dish and cover loosely with damp paper towel to prevent splattering. Heat at 50% power for 3-4 minutes for refrigerated portions, stirring halfway through. Check temperature reaches 165°F internally before serving. |
| Stovetop reheating | N/A | Place in saucepan over medium heat and stir frequently for 5-7 minutes until heated through. This method prevents uneven heating and allows you to control sauce consistency by adding water if needed. |
| Instant pot reheating | N/A | Place cooled chicken and sauce in instant pot inner pot. Press Sauté button, set to Low, and heat for 3-5 minutes while stirring occasionally. This method works well for larger quantities being reheated. |
Image suggestion: Clear glass containers showing separated components (chicken, sauce, rice) side-by-side, labeled with storage dates.
Nutritional Information
| Nutrient | Amount per Serving |
|---|---|
| Calories | 320 calories |
| Protein | 38g |
| Total Fat | 6g |
| Saturated Fat | 1.5g |
| Trans Fat | 0g |
| Cholesterol | 95mg |
| Sodium | 580mg |
| Total Carbohydrates | 28g |
| Dietary Fiber | 0g |
| Total Sugars | 24g |
| Added Sugars | 20g |
| Iron | 1.2mg |
| Calcium | 45mg |
| Potassium | 420mg |
Approximate values based on USDA nutritional database. Nutritional content varies based on specific ingredient brands and preparation method. This analysis assumes 4 servings with no additional oil or rice included in calculations.
Frequently Asked Questions
Can I substitute chicken thighs for instant pot honey garlic chicken breasts?
Yes, boneless, skinless chicken thighs create a juicier, more forgiving dish because their higher fat content keeps them moist even if slightly overcooked. Use 3 thighs (about 6 oz each) instead of 4 breasts, and add 2 minutes to the pressure cooking time, bringing the total to 14 minutes at high pressure. Thighs produce more sauce during cooking, so you may need to increase cornstarch slurry to 1.5 tablespoons if you prefer thicker consistency. The flavor becomes richer and less delicate than the breast version.
How do I know when instant pot honey garlic chicken is done cooking?
Cooked chicken reaches an internal temperature of 165°F measured with an instant-read thermometer inserted horizontally into the thickest part, away from bone. After the natural pressure release completes and you open the lid, insert a thermometer into the center of the largest chicken breast—it should register 165°F immediately. If it reads below 160°F, close the lid, manually set high pressure for 2 more minutes, and quick-release. The chicken will continue cooking slightly as pressure drops during natural release.
Why is my instant pot honey garlic chicken sauce too thin or watery?
Thin sauce results from skipping the cornstarch slurry step or not allowing the slurry to cook long enough in the simmering liquid. Always create a slurry by mixing cornstarch and water separately until completely smooth before adding to the pot—pouring dry cornstarch creates lumps. Pour the slurry slowly into simmering sauce while stirring constantly, then simmer for an additional 2 minutes to fully activate the cornstarch. If sauce is still too thin after these steps, mix another 1 tablespoon cornstarch with 2 tablespoons water and repeat the process.
Can I make instant pot honey garlic chicken ahead of time for meal prep?
Yes, this dish meal-preps exceptionally well for up to 4 days when stored in separate containers. Cook the recipe fully, allow it to cool completely, then divide chicken, sauce, and any accompanying rice into individual meal prep containers. Keep sauce and protein separated to prevent rice from absorbing excess liquid and becoming mushy. On serving day, reheat each component individually in the microwave or on the stovetop, then assemble the plate fresh. Combined storage is possible for 2-3 days, but separated storage maintains better texture and flavor quality.
What should I serve with instant pot honey garlic chicken for a complete meal?
Serve instant pot honey garlic chicken over jasmine rice, brown rice, or rice noodles—the grains absorb the glossy sauce perfectly. For a lower-carb option, plate chicken over steamed broccoli or cauliflower florets, which complement the Asian-inspired flavors beautifully. Egg noodles create a softer, more indulgent dish that catches sauce well. Include a simple side salad with sesame-ginger dressing to add freshness and balance the sweetness of the main dish. For entertaining, add steamed bok choy or snap peas alongside rice for visual appeal and nutritional balance.
Can I double this instant pot honey garlic chicken recipe?
No, do not double the recipe by stacking chicken—this creates uneven cooking with top pieces cooking faster than bottom pieces. Instead, make two separate batches using the exact same timing: 12 minutes at high pressure followed by 10 minutes natural pressure release. The timing remains identical because pressure cooking depends on steam circulation and weight rather than quantity. Two batches take approximately 50 minutes total (one batch cooks while you prep or relax), whereas attempting to cook all chicken simultaneously in one batch results in inconsistent doneness and disappointing texture.
Conclusion
Instant pot honey garlic chicken delivers restaurant-quality results in just 30 minutes, combining tender chicken with a complex sweet-savory sauce that rivals takeout versions. The pressure cooker guarantees consistent juiciness while the honey caramelizes against perfectly cooked meat, creating depth that slow cooking takes hours to achieve. By following the natural release method and using fresh garlic and ginger, you’ll create a dish that becomes a weekly staple in your kitchen. This recipe proves that weeknight cooking can be both fast and genuinely delicious—exactly what my grandmother taught me years ago about good food requiring care, not complexity.
Instant Pot Honey Garlic Chicken
Ingredients
- 4 boneless skinless chicken breasts
- 1/4 cup soy sauce (low sodium if preferred)
- 1/4 cup honey
- 4 garlic cloves, minced
- 2 tbsp fresh ginger, grated
- 2 tbsp cornstarch
- 1 tbsp sesame oil
- Cooking oil (avocado, vegetable, or olive), for searing
- Sesame seeds, for garnish
- Green onions, sliced for garnish
Instructions
- 1. Season chicken breasts with salt and pepper
- 2. Heat 1 tbsp cooking oil in the Instant Pot on sauté mode and sear chicken for 2-3 minutes per side
- 3. Add soy sauce, honey, garlic, ginger, and sesame oil to the Instant Pot
- 4. Pour 1 cup water or vegetable broth into the pot and lock the lid
- 5. Cook on high pressure for 9 minutes, then natural release for 10 minutes
- 6. Thicken the sauce by adding cornstarch mixed with 2 tbsp water to a small bowl while pot is releasing
- 7. Quick release remaining steam, return saucepan to heat, and bring to simmer until sauce thickens
- 8. Serve garnished with sesame seeds and green onions
Notes
For extra sweetness: add 1-2 tbsp honey
Leftovers last 4 days refrigerated; store in airtight containers
Serve with steamed rice, noodles, or roasted vegetables
