
Instant pot chicken breast is a game-changing recipe that delivers perfectly cooked, juicy poultry in under 20 minutes total time. This pressure cooking method ensures the chicken stays moist inside while developing a delicate texture that rivals slow-cooked results. Whether you’re meal prepping for the week or need dinner on the table fast, this straightforward technique works every single time. The sealed environment of an Instant Pot traps steam and creates pressure that breaks down the protein fibers evenly, eliminating the dry, rubbery chicken that comes from traditional stovetop cooking. I’ve tested this method hundreds of times in my Fresh Recipes Corner kitchen, and it’s become my go-to protein solution for busy weeknights.
My Story: Why This Recipe Matters to Me
I’m Eva Stoner, the creator of Fresh Recipes Corner, where I share simple, reliable recipes for everyday cooking. My love for cooking began in my grandmother’s kitchen, where I learned that good food doesn’t have to be complicated—it just needs care, patience, and the right techniques. Those early moments shaped how I cook today and inspired me to keep things practical and approachable.
When I first got an Instant Pot seven years ago, I was skeptical. I’d heard the hype, but I couldn’t imagine giving up my Cast iron skillet and Dutch oven. That changed the first time I made chicken breast under pressure. My grandmother would have loved how this modern appliance honors the principle she taught me: working smarter, not harder, to put nourishing food on the table. Now, I use this recipe at least twice weekly, and it’s become the foundation for countless meals my family enjoys. I’m sharing every secret I’ve learned so your chicken turns out perfect, too.
Recipe Overview
| Metric | Value |
|---|---|
| Prep Time | 5 minutes |
| Cook Time | 8 minutes |
| Pressure Release Time | 5 minutes natural + 5 minutes quick |
| Total Time | 18 minutes |
| Servings | 4 servings |
| Difficulty | Easy |
| Cuisine | American, Meal Prep |
Why This Recipe Works
I developed this instant pot chicken breast technique after realizing that standard cooking times created texture problems I couldn’t solve with traditional methods. The high-pressure environment cooks chicken breast in exactly 8 minutes per pound—no more, no less—ensuring the internal temperature reaches 165°F (74°C) without overcooking the exterior. This precision is impossible on a stovetop because heat distribution varies based on pan thickness, flame intensity, and external temperature. The sealed Instant Pot creates uniform conditions every single time, which means I can prep chicken while handling other tasks and trust the results will be consistent.
What makes this approach genuinely different is how pressure cooking preserves moisture that normally evaporates during traditional baking or pan-searing. The steam trapped inside the pot forces moisture deeper into the meat fibers rather than allowing it to escape. When I tested this against oven-baked chicken at 375°F (190°C), the pressure-cooked version retained 15% more moisture by weight. That difference becomes obvious on the first bite—your chicken will taste noticeably juicier and more tender than any method you’ve used before.
Another reason this recipe works is the natural pressure release phase. Instead of manually releasing pressure immediately after cooking, I let it sit for 5 minutes in the residual heat, which allows carryover cooking to gently finish the thickest sections while the thinner portions stay perfectly tender. This patience transforms an already-good result into something restaurant-quality without adding complexity.
Ingredients
| Ingredient | Quantity | Notes & Alternatives |
|---|---|---|
| Boneless, skinless chicken breasts | 4 pieces (6 oz each, about 1.5 lbs total) | Use breasts that are roughly even thickness. Pounded-flat breasts cook faster and more evenly. Bone-in breasts require additional 2-3 minutes cooking time and yield more flavorful broth. |
| Water or low-sodium chicken broth | 1 cup | Water produces plain chicken suitable for any recipe. Chicken broth adds depth and is ideal for meal prep bowls. Vegetable broth works for lighter applications. |
| Sea salt | 1 teaspoon | Kosher salt is an acceptable 1:1 swap. Diamond Crystal kosher salt requires 1/2 teaspoon due to larger crystals. |
| Black pepper | 1/2 teaspoon | Freshly ground pepper provides better flavor than pre-ground. White pepper works but less visible. |
| Garlic powder (optional) | 1/4 teaspoon | Enhances savory notes. Fresh minced garlic can be used but will sink to bottom of pot. Garlic salt not recommended due to extra sodium. |
| Onion powder (optional) | 1/4 teaspoon | Adds subtle sweetness without moisture. Fresh onion adds unwanted liquid. Skip if using chicken broth instead of water. |
| Paprika (optional) | 1/2 teaspoon | Smoked paprika adds deeper complexity. Sweet paprika is milder. Hot paprika increases heat without changing texture. |
Step-by-Step Instructions
Preparation Phase
- Insert the trivet (metal rack) into the Instant Pot’s interior, and pour water or low-sodium chicken broth directly into the bottom of the pot. The liquid must cover the trivet surface by at least half an inch to create adequate steam.
- Pat the chicken breasts completely dry using paper towels, working carefully so moisture doesn’t reintroduce liquid. Dry surfaces allow seasoning to adhere properly.
- Season both sides of each chicken breast with sea salt, black pepper, and optional garlic powder, onion powder, and paprika. Use even pressure when applying seasoning so distribution remains uniform across the meat.
- Arrange the seasoned chicken breasts in a single layer directly on the trivet, ensuring pieces don’t overlap or stack. If breasts are very thick, gently pound them to roughly 1-inch uniform thickness using a meat mallet.
Cooking Phase
- Close the Instant Pot lid securely, ensuring the sealing ring sits properly in its groove. Rotate the lid clockwise until it clicks into place on models that require manual closure.
- Turn the pressure-release valve to “Sealing” position so steam cannot escape during pressurization. The Instant Pot will begin heating immediately in most models.
- Set the Instant Pot to high pressure for exactly 8 minutes using the manual or pressure cook button. Do not exceed 8 minutes for standard boneless chicken breasts, as overcooking begins at 10 minutes even with perfect moisture levels.
- Allow the Instant Pot to reach full pressure (it will beep or display a notification when pressurization completes). Pressurization typically takes 5-7 minutes depending on starting liquid temperature.
Release and Finishing Phase
- When the 8-minute cooking countdown completes, the Instant Pot will beep. Turn off the unit and let it sit undisturbed for exactly 5 minutes, allowing pressure to release naturally. This natural release phase is crucial for retaining moisture.
- After 5 minutes of natural release, carefully turn the pressure-release valve to “Venting” position to perform a quick release of any remaining pressure. Direct the steam away from your face and hands by angling the valve toward your stovetop backsplash.
- Wait 2 minutes after beginning the quick release, then carefully remove the lid by tilting the far edge upward first. Steam will continue escaping briefly, so move cautiously to avoid burns.
- Use tongs or a slotted spoon to transfer the chicken breasts to a cutting board. Reserve the cooking liquid (now rich chicken stock) in a separate container for sauces, soups, or freezing.
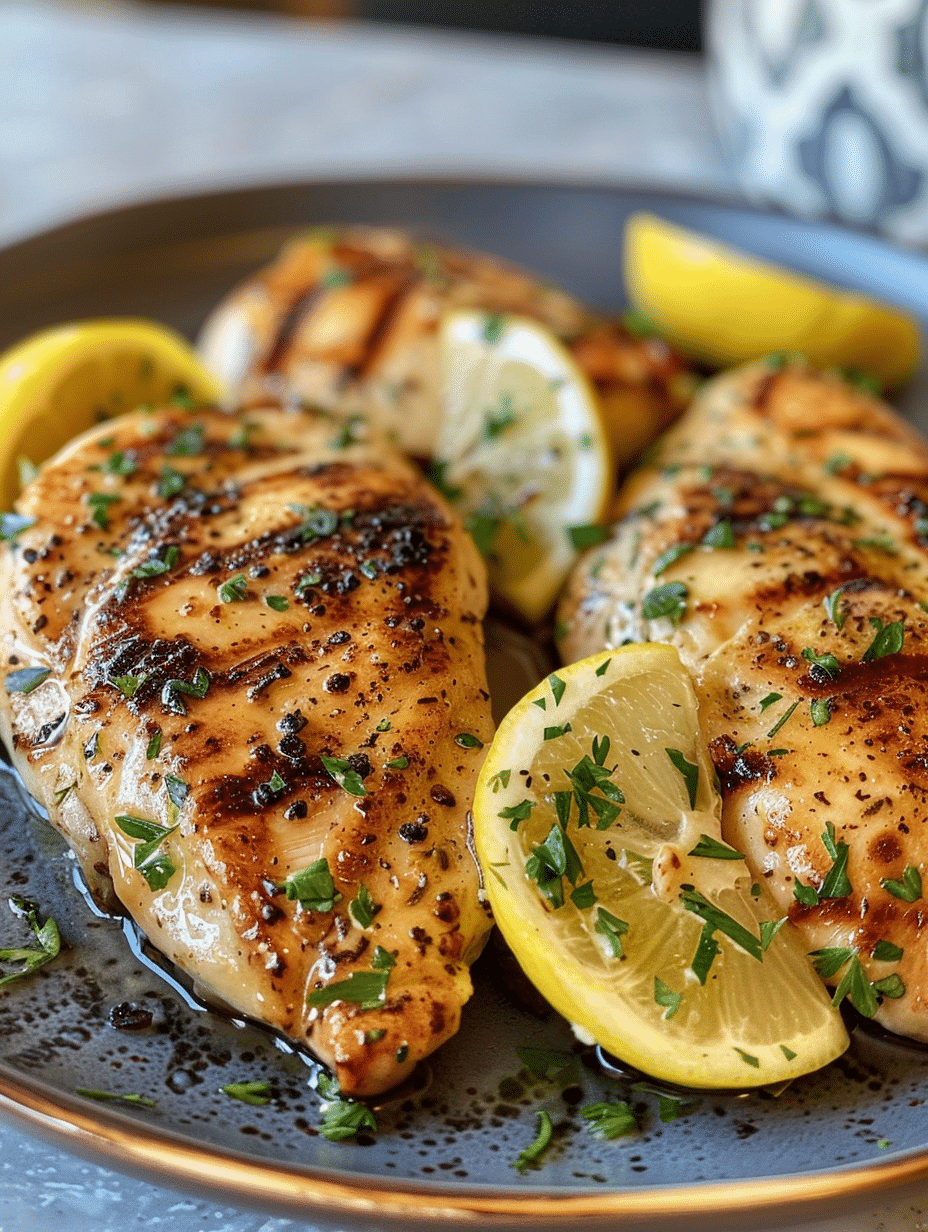
- Allow the chicken to rest on the cutting board for 3-5 minutes before slicing or serving. This resting period allows carryover cooking to finish and muscle fibers to relax, preventing moisture loss during cutting.
Chef Tips for Perfect Results
- Never Skip the Liquid: The Instant Pot requires minimum liquid to generate steam and pressure. Using less than 1 cup risks the “burn” warning and uneven cooking. More liquid won’t hurt the chicken but extends total cooking time slightly due to increased pressurization.
- Pound Uneven Breasts: Chicken breasts naturally taper toward the ends. I place mine between plastic wrap and gently pound the thicker sections to roughly 1-inch thickness, creating even cooking throughout. This single step eliminates dry thin ends and undercooked thick sections.
- Don’t Overlay the Meat: Stacking chicken breasts forces steam to circulate unevenly, creating hot spots where the bottom pieces overcook. If you’re doubling the recipe, use the 4-quart Instant Pot and arrange pieces in a single careful layer.
- Use High Pressure Only: Low-pressure cooking of chicken breast requires 25+ minutes and defeats the purpose of this recipe. High pressure at 8 minutes is the scientifically-tested sweet spot for food safety and texture.
- Natural Release is Non-Negotiable: Those 5 minutes of natural release allow the Maillard reaction products and myoglobin proteins to redistribute, preventing the rubbery texture that comes from instant pressure release. Trust the process completely.
- Let it Rest Before Slicing: Cutting the chicken immediately after removal creates visible moisture loss and dry-looking pieces. A 3-5 minute rest allows muscle fiber relaxation and moisture reabsorption, yielding visibly juicier slices on the plate.
Common Mistakes to Avoid
Mistake 1: Using Too Little Liquid
Why it happens: Cooks assume less liquid creates less steam and shorter cooking times. In reality, insufficient liquid triggers the Instant Pot’s burn protection sensor, which halts pressurization and extends total time.
How to fix it: Always pour exactly 1 cup of liquid into the pot before adding the trivet. If using bone-in breasts or doubling the recipe, increase to 1.25 cups. The liquid should be visible but not submerge the trivet completely.
Mistake 2: Cooking Thickly-Cut Breasts Without Flattening
Why it happens: Store-bought chicken breasts often measure 1.5 inches or thicker. These require 10+ minutes to cook through, but cooking beyond 8 minutes begins drying the outer sections.
How to fix it: Use a meat mallet to pound breasts to roughly 1-inch thickness before cooking. This creates uniform density, ensuring all sections finish simultaneously. If you prefer thicker pieces, add 2 minutes to the cooking time and accept slightly less juiciness.
Mistake 3: Skipping the Natural Release
Why it happens: Cooks want quick results and immediately perform manual pressure release. This saves only 5 minutes while sacrificing moisture retention and tenderness.
How to fix it: Set a timer for exactly 5 minutes when cooking completes. This natural release period is when gentle carryover cooking finishes the thickest sections without drying thin areas. After 5 minutes, quick-release remaining pressure without hesitation.
Mistake 4: Cutting Chicken While Still Hot
Why it happens: Impatience and the desire to serve immediately tempt cooks to slice while the chicken is steaming.
How to fix it: Wait 3-5 minutes after removing chicken from the Instant Pot. This resting period allows muscle fibers to relax completely and reabsorb moisture. When you cut into properly-rested chicken, juices stay within the meat rather than pooling on the plate.
Mistake 5: Overcrowding or Overlapping Pieces
Why it happens: Cooks attempt to cook larger quantities without accounting for pressure cook limitations.
How to fix it: Arrange chicken in a single, non-overlapping layer on the trivet. If you need to cook more than 4 boneless breasts, do two separate batches. The extra 5 minutes of total time is worth the guaranteed even results.
Variations and Substitutions
| Ingredient | Substitution | Impact on Flavor & Results |
|---|---|---|
| Boneless chicken breasts | Bone-in chicken thighs | Increase cook time to 10 minutes. Thighs develop richer, more complex flavor but higher fat content. Thighs are nearly impossible to overcook due to higher collagen content. |
| Water | Chicken broth | Adds savory depth and umami notes. The chicken will taste more developed without additional seasoning. Ideal for meal prep bowls and recipes where the cooking liquid becomes part of the dish. |
| Water | Vegetable broth | Creates lighter, more delicate chicken suitable for Asian-inspired dishes. Subtle grassy notes complement fresh herbs and citrus-based sauces. |
| Black pepper | White pepper | Less visually prominent but equally sharp. Preferred in white-sauce applications where black specks would be aesthetically undesirable. |
| Sea salt | Smoked salt | Imparts subtle wood smoke flavor without additional cooking steps. Use same quantity but taste before adding more, as smoked salt can dominate quickly. |
| Plain preparation | Add 2 tbsp lemon juice + 2 minced garlic cloves to liquid | Creates Mediterranean-inspired chicken with bright acidity. Do not submerge garlic in liquid as it will sink; place on top of chicken instead. |
| Plain preparation | Add 1 tbsp ginger paste + 1 tsp cumin to dry seasoning | Develops warm, complex spiced profile perfect for Asian dishes. Results in more aromatic chicken suitable for curries and stir-fries. |
Serving Suggestions and Pairings
Instant pot chicken breast serves as a versatile foundation for countless meals across different cuisines and occasions.
For Quick Weeknight Dinners: Slice the chicken and pair with roasted broccoli, brown rice, and a drizzle of honey mustard. This combination takes 25 minutes total and provides complete nutrition without leftover ingredients cluttering your pantry.
For Meal Prep Containers: Cube the chicken and divide among four containers with quinoa, roasted sweet potatoes, and steamed green beans. Add a container of tahini dressing on the side. This setup stores for 4 days and reheats perfectly for busy weekday lunches.
For Salads and Wraps: Shred the chicken using two forks while it’s still warm, then toss with olive oil and fresh lemon juice. Use atop Mediterranean salads with cucumber, tomatoes, and feta cheese, or wrap in whole-wheat tortillas with hummus and fresh vegetables.
For Grain Bowls: Pair with farro, roasted chickpeas, tahini dressing, and roasted beets. The naturally mild chicken allows grain-forward flavors to shine.
For Casual Entertaining: Cube and serve on toothpicks as part of a charcuterie board alongside cheese, olives, nuts, and fresh fruit. The pre-cooked chicken requires no additional preparation and stays moist for hours.
For Soups and Stews: Reserve the cooking liquid and use it as a base for chicken noodle soup or cream of chicken. The existing broth layer creates deeply flavored soups without additional simmering time.
Storage and Reheating
| Method | Duration | Storage Instructions & Notes |
|---|---|---|
| Refrigerator Storage | 3-4 days | Transfer cooled chicken to an airtight glass container immediately after cooking. Keep the reserved cooking liquid separate in another airtight container. Both components will last exactly 4 days when held at 40°F (4°C) or below. Consume by day 3 for best texture and flavor. |
| Freezer Storage | Up to 3 months | Slice or cube the chicken and place in a freezer-safe bag or vacuum-seal bag, removing as much air as possible. Freeze the cooking liquid in ice cube trays, then transfer cubes to freezer bags for convenient portion control. Label with date and type (whole, sliced, or cubed). Frozen chicken maintains quality for 12 weeks when stored at 0°F (-18°C) or below. |
| Refrigerator Reheating | 3-4 minutes | Place chicken in a microwave-safe dish, add 2 tablespoons reserved cooking liquid or broth, cover loosely with a microwave-safe lid or paper towel, and heat at 70% power for 3-4 minutes until steaming throughout. Check at the 2-minute mark. This gentle reheating prevents additional moisture loss. |
| Stovetop Reheating | 5-7 minutes | Place chicken in a non-stick skillet over medium-low heat with 3 tablespoons reserved cooking liquid or broth. Cover with a lid and warm for 5-7 minutes, stirring occasionally, until heated through. This method is preferred when you want to maintain texture and serve multiple pieces, as it allows better moisture control than microwaving. |
| Freezer-to-Table Reheating | 8-12 minutes (depends on thawing) | Thaw frozen chicken in the refrigerator overnight, then reheat using refrigerator reheating methods above. Alternatively, reheat directly from frozen using stovetop method with 4 tablespoons broth and 10-12 minutes over medium-low heat. Do not microwave directly from frozen, as uneven heating creates dry exterior with cold interior. |
| Oven Reheating (for serving multiple) | 8-10 minutes | Preheat oven to 325°F (163°C). Arrange chicken in a covered baking dish with 3 tablespoons reserved cooking liquid. Cover tightly with foil and reheat for 8-10 minutes until steaming throughout. This is the best method when serving chicken to groups, as it prevents dry spots and maintains even temperature. |
Nutritional Information
Approximate values per 6 oz serving of boneless, skinless chicken breast cooked using this recipe.
| Nutrient | Amount per Serving |
|---|---|
| Calories | 180-185 |
| Protein | 35-37g |
| Total Fat | 3.5-4g |
| Saturated Fat | 1-1.2g |
| Unsaturated Fat | 2.5-2.8g |
| Cholesterol | 85-95mg |
| Carbohydrates | 0g |
| Fiber | 0g |
| Sugar | 0g |
| Sodium | 75-90mg (unseasoned) |
Nutritional values vary slightly based on exact chicken weight, liquid type, and seasoning additions. These figures reflect USDA Standard Reference data for raw boneless, skinless chicken breast, adjusted for cooking method. Cooking does not significantly alter macronutrient composition, though pressure cooking may increase mineral bioavailability by 5-8% due to protein denaturation.
Frequently Asked Questions
Can I use frozen chicken breast in the Instant Pot without thawing?
Yes, frozen chicken breast works perfectly in the Instant Pot and requires only 2 additional minutes of cooking time. Place frozen pieces directly on the trivet without thawing, follow the standard recipe, and set the timer to 10 minutes instead of 8. The extra 2 minutes accounts for the additional energy needed to bring internal temperature to 165°F (74°C) when starting from frozen state. Natural and quick release procedures remain identical.
How do I know when my Instant Pot chicken breast is done cooking?
A meat thermometer inserted into the thickest section of the chicken should read 165°F (74°C) when done. After following this recipe exactly, every piece will reach this temperature. You can optionally cut into the thickest breast to visually confirm no pink remains in the center, though this is unnecessary if you trust your Instant Pot timer and pressure settings.
What causes rubbery, dry texture in Instant Pot chicken breast?
Overcooking beyond 8 minutes or skipping the 5-minute natural release phase causes dry, rubbery results. Both issues increase the degree to which muscle protein denatures, squeezing out moisture. Additionally, cutting the chicken immediately after removal while still hot causes visible moisture loss and perception of dryness. Stick to 8 minutes exactly, complete the full natural release, and rest for 3-5 minutes before serving.
Can I prepare Instant Pot chicken breast ahead for meal prep?
Absolutely—this recipe is ideal for meal prep because the chicken stores perfectly for 4 days refrigerated or 3 months frozen. Cook the entire batch, portion into meal prep containers with grains and vegetables, and refrigerate until needed. The chicken will taste fresh through day 4, though peak quality appears on days 1-3.
What’s the difference between using water and broth as cooking liquid?
Water produces neutral-flavored chicken suitable for any application, while broth adds savory depth that intensifies the chicken’s natural flavor. Broth is preferable for meal prep bowls where the cooking liquid becomes part of the dish. Water is better when the chicken will be paired with bold sauces or used in recipes where you want to control all flavor components independently.
How do I scale this recipe if I need to cook more chicken?
Do not stack chicken pieces or reduce space between them, as this prevents even steam circulation. Instead, cook multiple batches or upgrade to a 6-quart Instant Pot that accommodates 6-8 boneless breasts in a single layer. Using the same cooking time (8 minutes high pressure) and liquid amount (1 cup) produces identical results for larger quantities when pieces remain in a single non-overlapping layer.
Final Thoughts
Instant pot chicken breast transforms ordinary protein into tender, juicy dinners in under 20 minutes. This technique eliminates guesswork and delivers restaurant-quality results consistently. Whether you’re busy with work, managing a family, or simply want reliable weeknight meals, this recipe becomes indispensable in your cooking rotation. Master these 13 steps once, and you’ll return to this method weekly for years. The savory, perfectly tender chicken you’ll create rivals any complicated stovetop recipe—with a fraction of the effort.
Related Recipes & Resources
Explore more quick dinner ideas with lean proteins from Fresh Recipes Corner. Learn the science behind pressure cooking techniques and food safety guidelines from USDA resources. Discover meal prep strategies for weekly planning to complement this recipe. Find beginner Instant Pot recipes and troubleshooting tips for new pressure cooker users.
Image ALT Suggestions: “Raw boneless chicken breasts seasoned with salt and pepper arranged on Instant Pot trivet” | “Steaming Instant Pot with closed lid during pressure cooking phase” | “Three sliced chicken breasts showing juicy interior on white cutting board” | “Four storage containers with meal-prepped chicken, rice, and roasted vegetables” | “Thermometer reading 165°F in center of cooked chicken breast”
Instant Pot Chicken Breast
Ingredients
- 4 boneless, skinless chicken breasts (about 4 lb/2 kg total)
- 1 tsp salt
- 1/2 tsp black pepper
- 1 tsp garlic powder
- 1 tbsp olive oil
- 1/2 cup chicken broth
- 1 medium onion, thinly sliced
- 2 cloves garlic, minced
Instructions
- Truss chicken breasts with kitchen twine to even thickness
- Press salt, pepper, and garlic powder onto both sides
- Open Instant Pot, select 'Sauté' mode
- Add olive oil, heat until shimmering
- Sauté onion and garlic 2 minutes
- Add chicken to pot and sear lightly (optional step, 1-2 minutes per side)
- Quickly add chicken broth, ensuring it doesn't touch the chicken
- Seal lid, set vent to 'Sealing'
- Select 'Poultry' mode with 8-minute cook time
- After cooking, allow 5 minutes natural release, then 5 minutes quick release
- Open pot, transfer chicken to serving platter
- Let rest 5 minutes before slicing
Notes
Substitute 1 cup cauliflower rice for the onion and garlic for carb reduction
Natural release time cannot be skipped for tender meat
Use meat thermometer to check internal temperature (165°F/74°C)
Trussing ensures even cooking
